Messaging on the web
Logging In
You can access Schoolcomms from home or school by going to www.schoolcomms.com and clicking the login button and then school login. You will be prompted to enter your Schoolcomms username, memorable data and password.
From the Web messenger you can send an email/text, view the inbox, view sent items, access the payments area (if applicable) and view information regarding School Gateway. You will not be able to perform a Schoolcomms import from home. The data used will be stored from the last import completed.
The multi-user at the school can reset a Schoolcomms user’s Memorable Data and Password, unlock a user, and edit the email connected to the account.
This would be actioned in User Management via the Web version.
Click on the user then click on edit and edit as required.
Compose Message
By clicking the envelope message icon on left hand icon bar, you can access all of Schoolcomms Messaging abilities; Sending an email/text, Inbox, Drafts, Scheduled and Sent Items.
Compose Message is the first section of the messaging licence.
There are two tabs at the top; Email or Text. Please select the type of communication you would like to send.
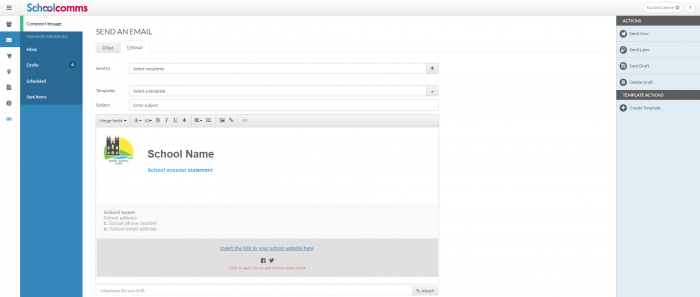
Sending an Email
Select the Email tab at the top of the page
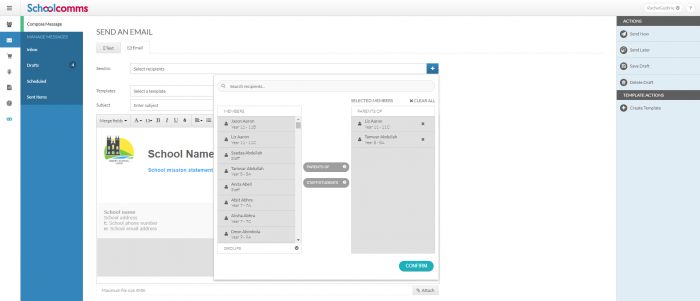
To select recipients, click Select Recipients in the Send to drop down box. A pop up will appear with individual contacts or groups listed in the left column. Click on an individual/group name and then click Parents Of or Staff/students. The recipients will appear on the right-hand side.
Click Confirm for the selected contacts to appear in the email/text.
If you have some pre-existing templates you can choose to use one of these for your message by clicking Select a Template, alternatively you can type the message content directly into the large text box.
If you don’t have any templates created, you can create them for future use by clicking Create Template under the Template Actions on the right-hand side.
Once you have typed your message, you may want to attach documents to your email. Clicking the Attach button will allow you to add documents from your computer.
When you have typed your message, it is now ready to send. On the right-hand side, you can decide when to send your email;
Send Now – This will immediately send the completed email to your selected contacts.
Send Later – This will allow you to diarise the completed email to your selected contacts, to be sent on a date and time in the future.
Once you click Send Now, Schoolcomms will ask you to confirm if you are sure you want to send this email. Clicking Yes will send the message immediately. Clicking No will close the dialogue and the message will allow you to edit the message.
Paper Copies
If some of your recipients do not have an email address you will see this message:
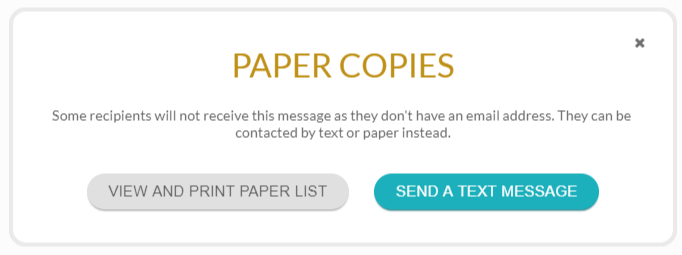
From here you can view and print a paper list or if you need to resend a text message/email depending on the original message type.
When you chose to send a text/email the system will have already chosen the recipients for you. Click Send Now to send the message.
Sending New Look Templates
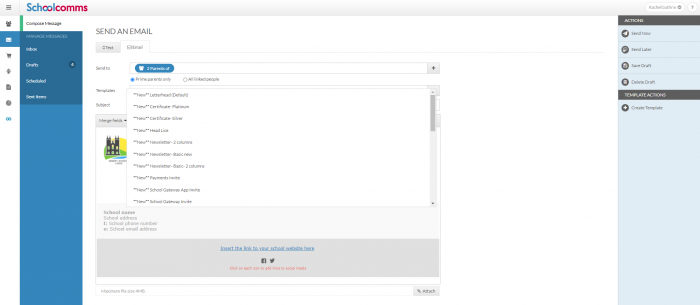
- Within Send Message, select Email.
- Select the recipients for your message.
- From the Templates drop down, select the **New** template you wish to use:
- **New** Achievement Award
- **New** Certificate Bronze
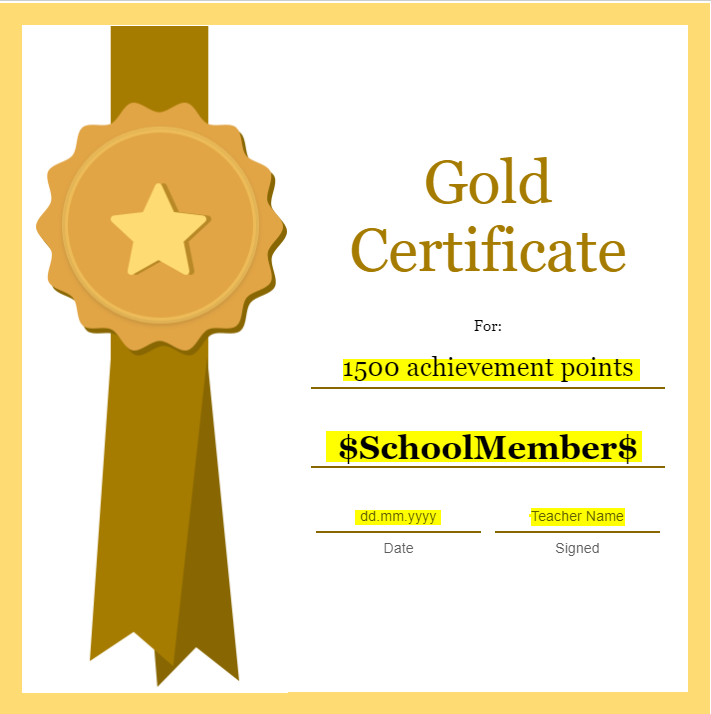
- **New** Certificate Gold
- **New** Certificate Platinum
- **New** Certificate Silver
- Once you have selected a template, you can edit the template to personalise the text. To do this click on the area you wish to change and over type the text.
- Enter a subject for your message.
- Click Send Now or Send Later to send your email to parents.
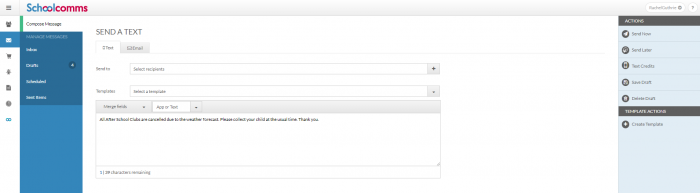
Sending a Text
Select the Text tab at the top of the page
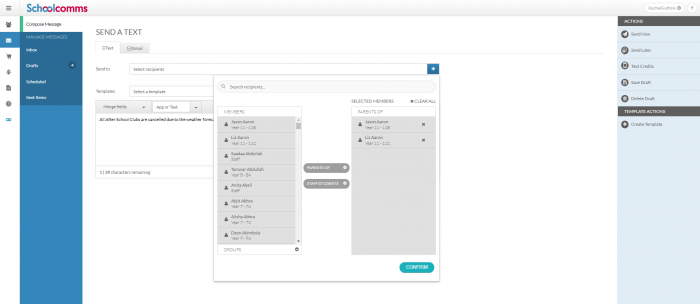
To select recipients, click Select Recipients in the Send to drop down box. A pop up will appear with individual contacts or groups listed in the left column. Click on an individual/group name and then click Parents Of or Staff/students. The recipients will appear on the right-hand side.
Click Confirm for the selected contacts to appear in the email/text.
If you have some pre-existing templates you can choose to use one of these for your message by clicking Select a Template, alternatively you can type the message content directly in to the large text box.
You can send multi length text messages which will send up to 4 messages with each message containing 160 characters.
Please note the multi length text message functionality is not available if you are using UNLIMITED TEXTS, you will have to create individual messages of up to 160 characters instead.
If you don’t have any templates created, you can create them for future use by clicking Create Template under the Template Actions on the right-hand side.
When you have typed your message, it is now ready to send. On the right-hand side, you can decide when to send your text;
Send Now – This will immediately send the completed text message to your selected contacts.
Send Later – This will allow you to diarise the completed text message to your selected contacts, to be sent on a date and time in the future.
Once you click Send Now, Schoolcomms will show you a message summary and will ask you to confirm if you are sure if you want to send this text.
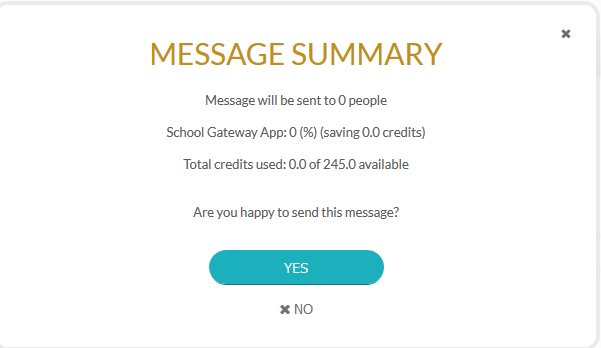
Clicking Yes will send it immediately. Clicking No will close the dialogue and will allow you to edit the message.
Paper Copies
If some of your recipients do not have a mobile number you will see this message:
From here you can view and print a paper list or if you need to resend a text message/email depending on the original message type.
When you chose to send a text/email the system will have already chosen the recipients for you. Click Send Now to send the message.
Ordering Text Credits
- To order text credits please go to Dashboard
- Click on Messaging
- Click on Compose Message
- Select to send a Text
- Click on the Text Credits tab on the right-hand side of the screen
- You will be shown how many credits you have, click the Order A Text Credit Bundle drop down to view available bundles
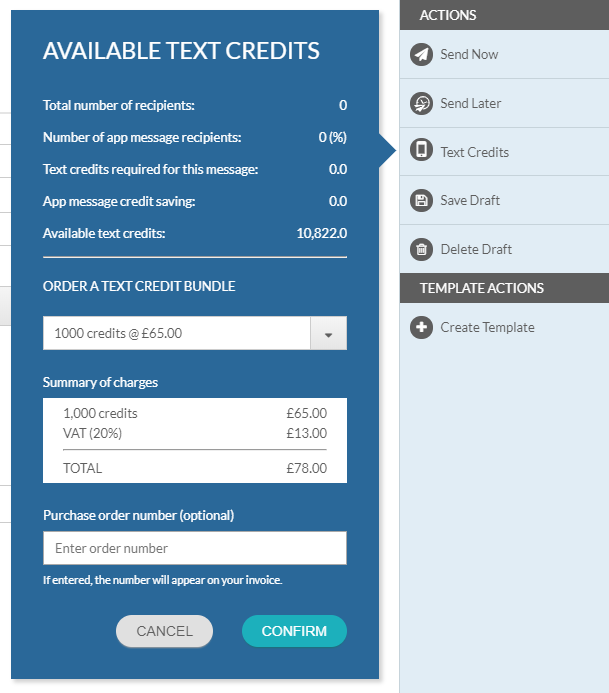
- Select which bundle you wish to purchase and enter your Purchase order number. If you have an unlimited text licence then please enter ‘Unlimited’, you will not be charged. Click Confirm to finalise your order.
- Your texts are available immediately and you will be invoiced for the chosen bundle.
Inbox
Click on Inbox in the left-hand menu to be taken to your Messaging Inbox. Here you will see a list of all Text and App messages that have been received from parents.
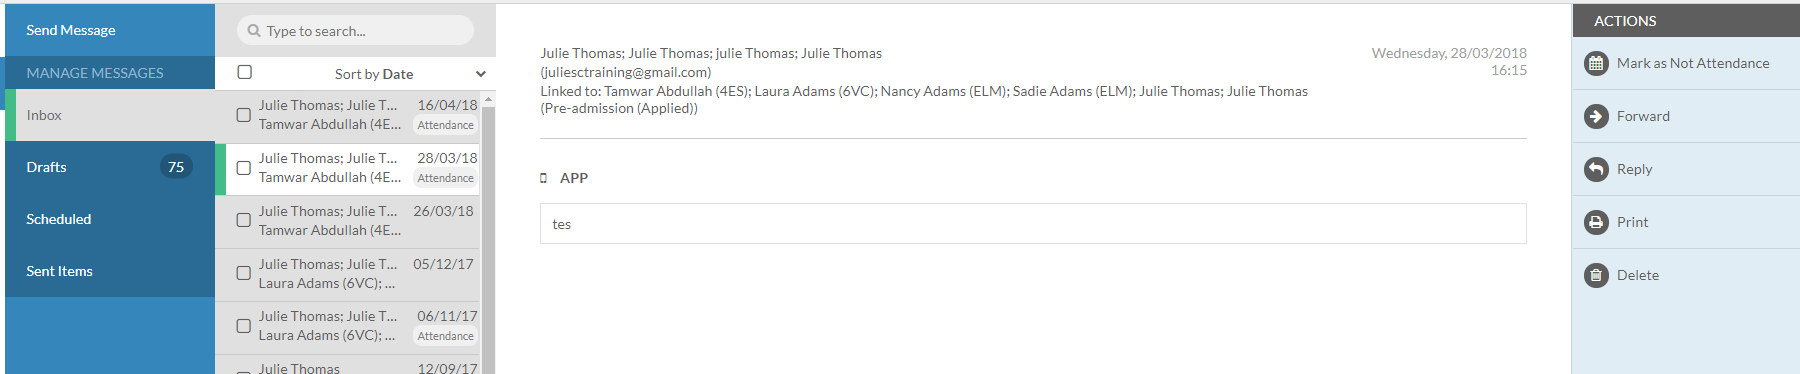
Click on the message you would like to view, you can find the message you would like by scrolling through or searching in the Search Bar at the top of the list.
When you have selected the message, the content will become visible in the main content field and a menu will open on the right-hand side of the screen. Within this menu you can Print a copy of the message or permanently Delete the message, Mark as Attendance or Not Attendance, Reply and or Forward the message.
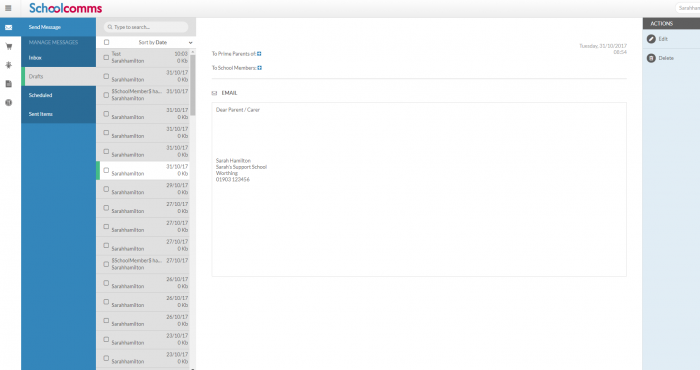
Drafts
Click on Drafts in the left-hand menu to be taken to a list of your current Draft messages.
Each time you click into Compose Message, Schoolcomms will create two blank drafts (two blank drafts will always be displayed by default).
Click on the message you would like to view, you can find the message you would like by scrolling through or searching in the Search Bar at the top of the list.
When you have selected the message, the content will become visible in the main content field and a menu will open on the right-hand side of the screen. Within this menu you can choose to Edit or Delete the template.
If you choose to Edit the message, you will be taken to the Send Message screen allowing you to add recipients, amend content and send your message.
Scheduled Messages
To schedule a message via the Web version of Schoolcomms, please go to:
- Click on Dashboard.
- Click on Messaging.
- Click on Compose a message.
- Select either Text or Email.
- Add the recipients and compose the message.
- Click on Send Later.
- Input the Date and Time required and click on Confirm.
To view Scheduled Messages (only the creator of the scheduled message can cancel the scheduled message):
In desktop, the date range in Sent Items needs to cover the date the message was created, rather than the date that it is scheduled to be sent. Scheduled messages will always show at the top of the list, so even if you do have to extend the date range, you won’t need to scroll through the list of messages to find them.
Alternatively, Messaging on the Web has its own dedicated Scheduled folder and shows all scheduled messages regardless of date.
Via the Web:
- Click on Dashboard.
- Click on Messaging.
- Click on Scheduled in the left-hand menu to be taken to a list of your current scheduled messages. Messages will appear in time and date order.
- Click on the message you would like to view; you can find the message you would like by scrolling through or searching in the Search Bar at the top of the list. When you have selected the message, the content will become visible in the main content field and you will have the ability to cancel the message in the right-hand menu.
Sent Items
Click on Sent Items in the left-hand menu to be taken to your Sent Items screen. Here you will see a list of all Text, App and Email messages sent.
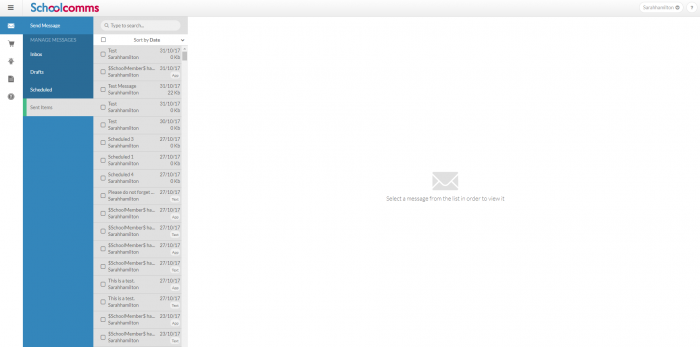
Click on the message you would like to view, you can find the message you would like by scrolling through or searching in the Search Bar at the top of the list.
When you have selected the message, the content will become visible in the main content field and a menu will open on the right-hand side of the screen. Within this menu you have further actions for the selected message, such as: viewing Dispatch/Delivery Status; Printing a copy of the message permanently; Deleting the message; and viewing the Paper Copies of the message.
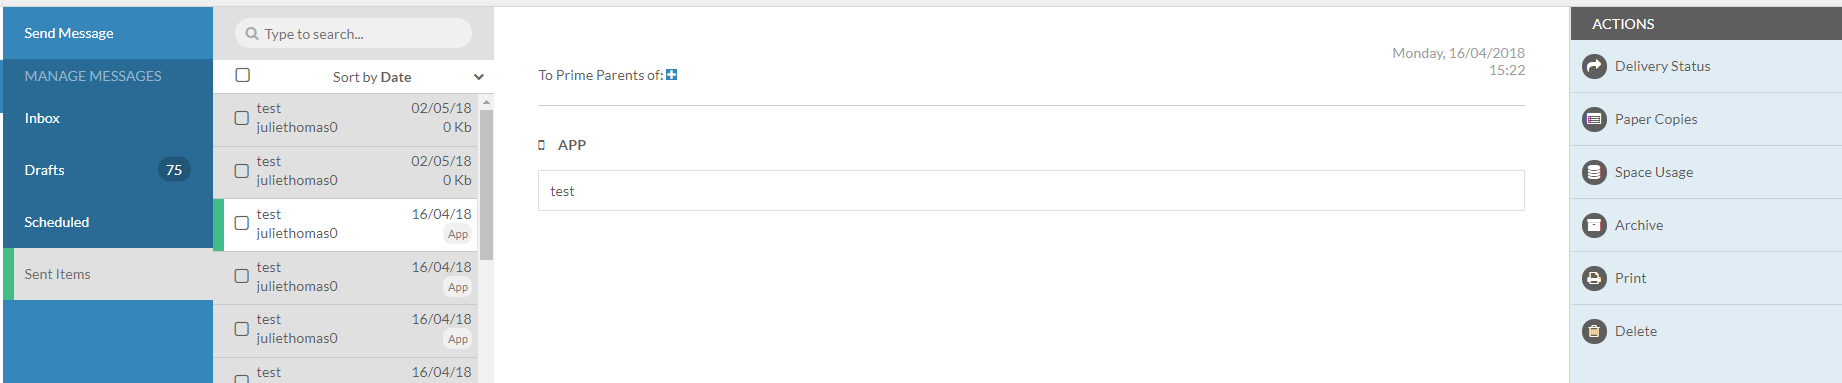
You will also be able to Archive a message and view your Space Usage.
View Space Usage and Archive Messages
If you are unable to send a message it may be that your usage has reached maximum capacity. To view your space usage allowance click into the sent items, select a message from the left, click Space Usage from the Right hand menu.
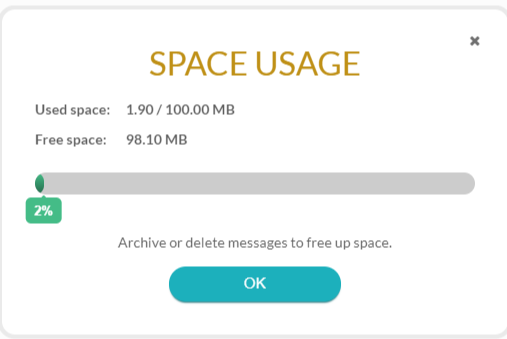
If your space usage is 75% or more, you will need to archive or delete some messages to free up the space.
To Archive Messages, go to the sent items, select the messages you wish to archive from the left-hand side. Click Archive from the menu on the right.
The document is saved as a download. From here you can store the document to a folder of your choice. Please note this downloads as a compressed file and if you wish to view the recipients you will need to extract the file before storing it.
Paper Copies
Click on Paper copies to view who needs to receive a copy of the message via another message. Go to the sent item, select the message you wish to view from the left-hand side. Click Paper Copies. From here you can view and print a paper list or send a text message/email depending on the original message type.
When you choose to send a text/email, the system will have already chosen the recipients for you. Click Send Now to send the message.