Using Schoolcomms for Covid-19 testing and consent
Messaging License
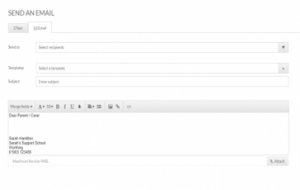
You can send an email or text/app message asking for a parent to inform you in writing that they give their consent for an action or activity. To do this via the web version of Schoolcomms click the envelope message icon on left hand icon bar.
- Select Send a Message on the left-hand side of the screen.
- There are two tabs at the top; Email or Text. Please select the Email tab.
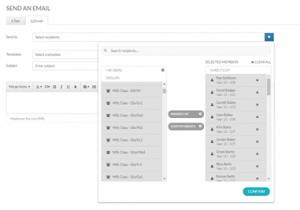
- To select recipients, click Select Recipients in the Send to drop down box. A pop up will appear with individual contacts or groups listed in the left column. Click on an individual/group name and then click Parents of or Staff/students. The recipients will appear on the right-hand side.
- Click Confirm for the selected contacts to appear in the email/text.
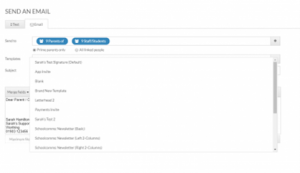
- If you have some pre-existing templates you can choose to use one of these for your message by clicking Select a Template, alternatively you can type the message content directly into the text box.
If you don’t have any templates created, you can create them for future use by clicking Create Template under the Template Actions on the right-hand side. Here you will be able to add any text or images you would like to include, as well as giving your template a name so that it is easily identifiable. Once you have Saved your new template, it will be accessible to all users within the Templates list.
Once you have typed your message, you may want to attach documents to your email. Clicking the Attach button will allow you to add documents from your computer.
When you have typed your message, it is now ready to send. On the right-hand side, you can decide when to send your email;
Send Now – This will immediately send the completed email to your selected contacts.
Send Later – This will allow you to diarise the completed email to your selected contacts, to be sent on a date and time in the future.
Once you click Send Now, Schoolcomms will ask you to confirm if you are sure you want to send this email. Clicking Yes will send the message immediately. Clicking No will close the dialogue and the message will allow you to edit the message.
Email responses from parents will either go back to your schools dedicated email inbox, or the inbox of the user sending the message. Where responses are received will depend upon your User Account settings. Steps to create and amend User Accounts can be found here
Payments License
You can collect parental consent using your Schoolcomms Payments licence by completing the following steps:
From the blue menu bar on the right select create Payment request.
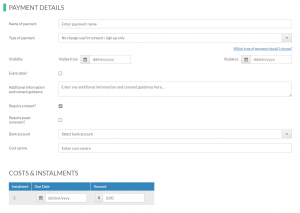
You will now see a form to complete the details of the payment request. Please complete the following steps:
- Name of Payment – this is the name that will appear to parents within School Gateway.
- Type of payment – please choose from the drop-down menu: No charge: use for consent/sign up only.
- Visibility – input your visibility dates of how long parents will be able to give their consent via School Gateway. NB: After the visible to date has expired the ability for the parent to give their consent online will cease.
- Event Date – please tick if you have a date to add for the event/activity you are collecting consent for if not please do not tick.
- Additional Information and Consent Guidance – please put anything you wish your parents to know at the point of providing consent i.e. times, that an email has been sent about this or a question you may want to ask the parent for example will you child be wanting a morning or afternoon session.
- Require Payer Comment – only tick this box if you have asked a question in the previous above box that you require a response from the parent for.
- Bank account – please select a bank account from your list of accounts.
- Cost centre – please enter a code if you have one that relates to the consent you are collecting, otherwise you can leave this blank.
- Due date – please enter the date you would ideally like to have collected all the consent by. This date must fall between the two visibility dates that you entered earlier.
- Amount – leave at £0.00.
- Add your groups or members you would like to add to the payment request. You can do this either by using the search bar or scrolling through the relevant group or members section on the left-hand side of the screen. Click on the groups/members you wish to select. They will then turn blue. Click the add button so the names move to the box on the right-hand side. If you move across a name by accident that should not be there, please just click the “x” by that person’s name to remove them.
Click Save in the top right-hand corner.
You will now be asked to compose a message. Click yes to go to the screen where you can compose an email to send to all the people you have just added to the Payment Request, letting them know they can give their consent via School Gateway.

To collate the consent given & any answers given by parents (if you clicked require payer comment as explained above) please do the following:
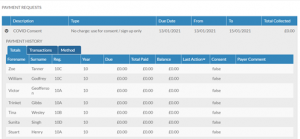
Go to your Payment Reports which can be found on the blue menu bar on the left-hand side in your Payments screen.
From the list of reports select the Payment Request Overview.
Using the search bar on the left-hand side please type in the name of the payment request you made and then when it appears click onto it to display in the middle of the screen.
You will then see all the names of the people listed in the payment request.
If you look to the far-right hand side, you will see you have the blue headers of Consent and Payer Comment. Until someone has given their consent it will show as false but once given will change to true. In the Payer Comment column, you will see any answer a parent has left.
Clubs License
If you have our Clubs licence you can set up a Club to record parental consent. Please complete the following steps to do this:
- Within Schoolcomms click into Clubs on the left-hand side of the screen.
- Click Create Club on the left-hand side of the screen.
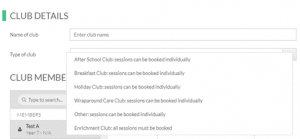
- Name the club i.e.) Collecting Consent for Covid-19 testing for students.
- Select enrichment club from the dropdown list as shown below.
- Finally select the school members you would like to make the club available to by selecting the individual members or whole groups on the left-hand side, and then click Add to add them into the Club.
- Click Save in the right-hand corner to save your Club.
The next step is to create a club session.
- Click the Create First session box in the middle of the screen or Create Sessions button on the right-hand side.
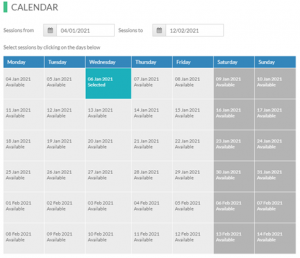
- You will be taken to the Calendar page.
- At the top of the screen choose the date range that the date for the event you are collecting the consent for falls within.
- Highlight the relevant date/s this is by clicking on the individual squares, or by clicking the word ‘Wednesday’ if the event/action is every Wednesday, for example.
- You will see the Charge section, where you can select ‘My club doesn’t have a charge’.
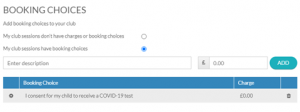
- Next select ‘My club has booking choices’. Here you can then add the description of the consent you are collecting, for example: I consent for my child to receive a COVID-19 test.
- When you are happy with the charge and booking choices, click Save in the top right-hand corner of the screen.
Now please click into “this club’s sessions cannot be booked in School Gateway” which will be in the middle of the screen. From the next screen please Tick the box for “sessions will be visible in School Gateway” and the box to “enable online bookings”.
You can now control when parents are able to book up until by using ‘Bookings can be made up until’ – please put the latest date/time that parents can give their consent for the future session date you put in earlier.
Then click Save on the top right-hand side.
Your club is now set up & live so parents can start giving their consent via School Gateway.
To monitor who has booked onto the Club so far and given their consent, from the menu bar on the right-hand side of the Club click Manage Sessions. You will then see a list of all the names of the students that the parents have given consent for so far. You can print this list if you wish by clicking Print Register from the top right-hand corner.
Create a link to a Google Form
If you have created a Google Form to collect consent, you can create a link that parents will be able to access via School Gateway simply by clicking on the icon within the app.
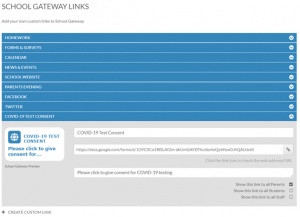
To access School Gateway Links please follow the steps below.
- Within Schoolcomms click the Dashboard tab.
- Once the Dashboard window opens click the School Gateway logo on the left-hand side of your screen.
- Here you will see several options you can customise with links to external internet pages.
- Click on the section you would like to add a link for and paste the required web address into the Link box. You can then test this link by using the Link Icon next to this box.
- Type a description in to the Description box, if needed, and decide if you would like this link to be available to Students, Parents or Staff.
- If the page you would like to link to is not listed as an option, click Create Custom Link and add another.
- Once happy, click Save.