Payments
Full Payments Training
Reconciling Your Settlements
Dates
Reconciling your Schoolcomms settlements
Schoolcomms will disburse any money the school receives through online transactions in either a weekly or fortnightly cycle, provided your bank accounts have been approved. The money will be settled into the bank account(s) you the school have in your Payment Settings area in Schoolcomms Payments. To reconcile monies disbursed to your account please follow the steps below:
- On the school’s bank statement, take note of the date and the amount you have received into your account from Schoolcomms.
- Open Schoolcomms and go to the Payments area. Click on the Payments Reports tab on the left hand side and select the Settlement Reconciliation Report.
- Change the date range to include the dates you wish to view and filter.
- Click onto the settlement date you wish to check – this will give you a breakdown of the payment requests that this settlement relates to.
If you need to check the individual transactions that a particular settlement relates to, open Schoolcomms and go to the Payments area. Click on the Payments Reports tab on the left hand side and select the Transaction Day Book.

- When the Transaction day book is open, you will have two date pickers at the top of the report. Enter a large date range in the past, we advise the previous two months to ensure all payments are picked up. You will also see all the column headers have Filter Icons to allow you to filter your data.
- To filter the report further, you will need to export it to an Excel document. To do this click the Export button within the report.
- Open the Excel document, there is one task that needs to be done to ensure all the correct payments are listed. Highlight all the column headers, click your Sort & Filter button and select the Filter option.
- You will now have a drop down button on all of the column headings. Click on the drop down button on the Settlement date column (Column S) and make sure you only have ticked the settlement date you are reconciling, and this will then remove any other settlement dates and blank columns. If a transaction has a blank settlement date in this report then this means this money has not yet been settled to the school.
- You will now have a report showing all the transactions for this settlement period and if you total the Amount column (Column C) this should equal the amount you received in your bank account. You can then filter this report down further to give you the data that is needed.
Payment Requests
- To view and manage your Payment Requests go to Payments.
- From here you can set up Payment Requests and send email or text/app message about payment request to let people know what is available to pay, or is overdue.
- Currently visible Payment Requests are displayed within the Active section.
VIDEO: Creating and editing payment requests
Create a new payment request
- To create a new payment request go to Payments > Create Payment Request
- Give your Payment Request a name and select the appropriate Payment Request type. See the list below for examples of when to use different payment types:
- Fixed amount: can be paid more than once – set price items that may need to be purchased several times, such as school ties
- Fixed amount: only needs to be paid once – set price for one time payment such as £10 for a zoo trip
- Fixed amount: paid in defined instalments – high value events with a set instalment plan such as £750 ski trip
- Flexible amount: can be paid more than once – regular payments where different parents pay different amounts, such as dinner money or school clubs
- Flexible amount: only needs to be paid once – one off payment for different amounts, such as voluntary contributions
- No charge: use for consent/sign up only – free to attend events such as a trip to the library
- Reducing balance: allow partial payments – high value events where parents can pay little and often such as a £750 ski trip
If you would like more detail about payment request types please click here.
Hint: Schoolcomms Clubs or Dinners customers will also see Clubs and Dinners types to be used when creating chargeable clubs or setting up new dinner plans. Schools using either SIMS dinner money or a cashless caterer will also see either dinner money or catering payment request types.
- The visible from and until dates determine the date range that the invited School Gateway user will be able to see the payment request online
- Select Require consent if you wish to gain parental consent (only parents with Parental Responsibility can see payment requests that require consent).
- Select Require payer comment if you want to force the payer to leave a comment before they are able to process the payment
- Enter the instalment details of the payment. If you are using a paid in instalments type, use the Add Instalment button to add a new instalment
- If you wish to limit the number of places on the payment request available, please use the limited places tick box. This will cap the number of members can pay on this request, once the limit has been reached the payment request will not appear on members School Gateway accounts
- To select members, use the list on the left of the screen and highlight the member(s)/group(s) from the list and click Add; the selected members will be moved to the right hand box
- When you are happy with the request select Save, or Cancel to return to the Payment Request screen
Clone a Payment Request
We appreciate that creating Payment Requests from scratch can be time consuming, so the introduction of Clone a Payment Request should save you a lot of time. To Clone a Payment Request, please follow the instructions below;
- Within Payments, find the payment request you wish to clone
- Click Clone in the right-hand menu
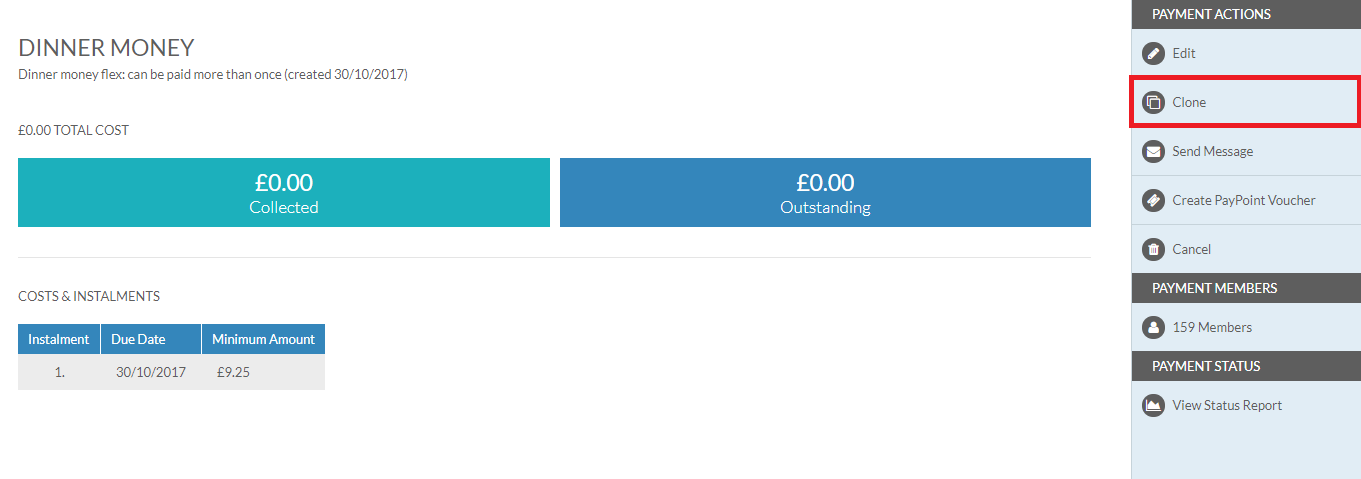
- You will be taken to the Clone Payment Request screen
- The name of the payment is prefixed with ‘CLONE-‘
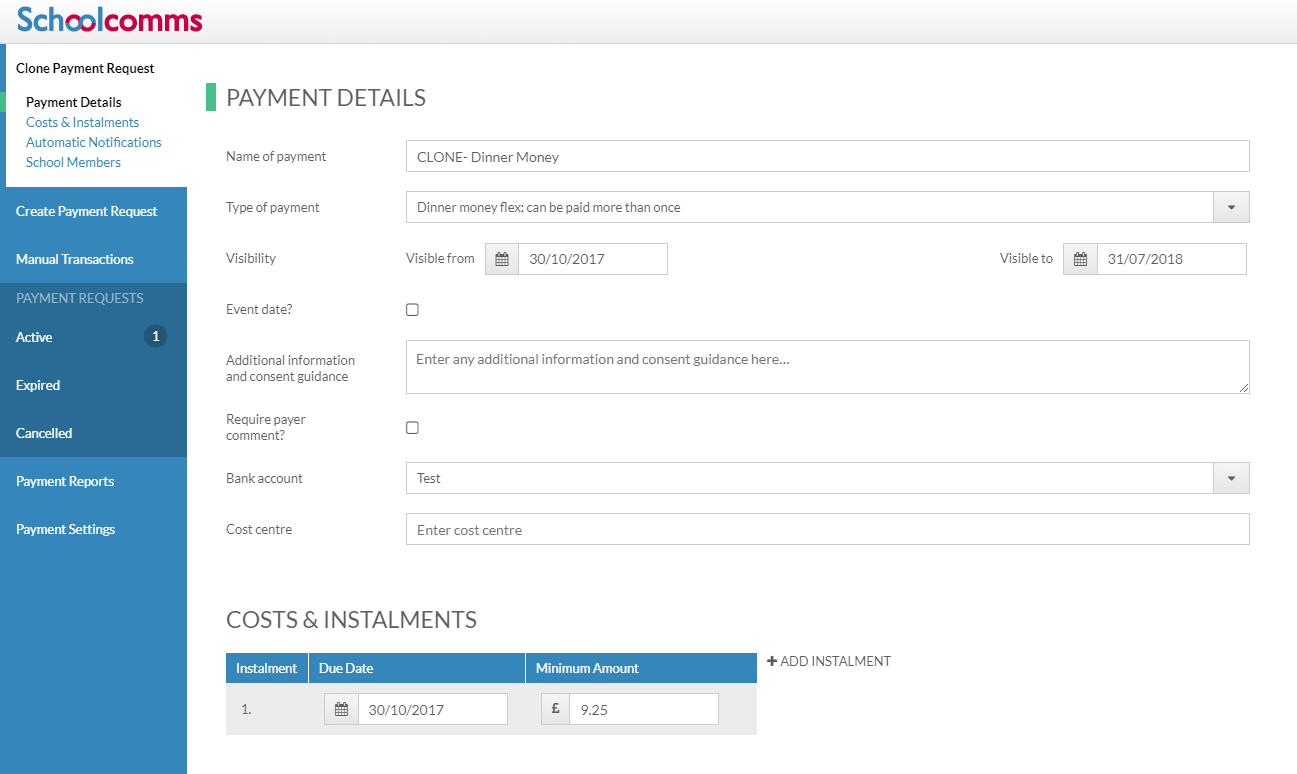
- Amend the details as necessary then click Save
Edit an Existing Payment Request
- To edit an existing payment request go to Payments | Active Payment Requests
- Select a request from the list and click Edit to amend it
- If a payment has not been processed on the payment request you will be able to edit any of the information
- If a payment has been processed you will only be able to edit the description, the visible from/until dates, event date, additional info & consent guidance, require consent, require comment from payer, cost centre, limited places and the school members.
- Section two with the payment request amount will become locked down along with the type and the bank account
- If the cost of the trip decreases or you wish to cancel a payment request, you will need to refund anyone that has already paid
- Select Save to save the changes made
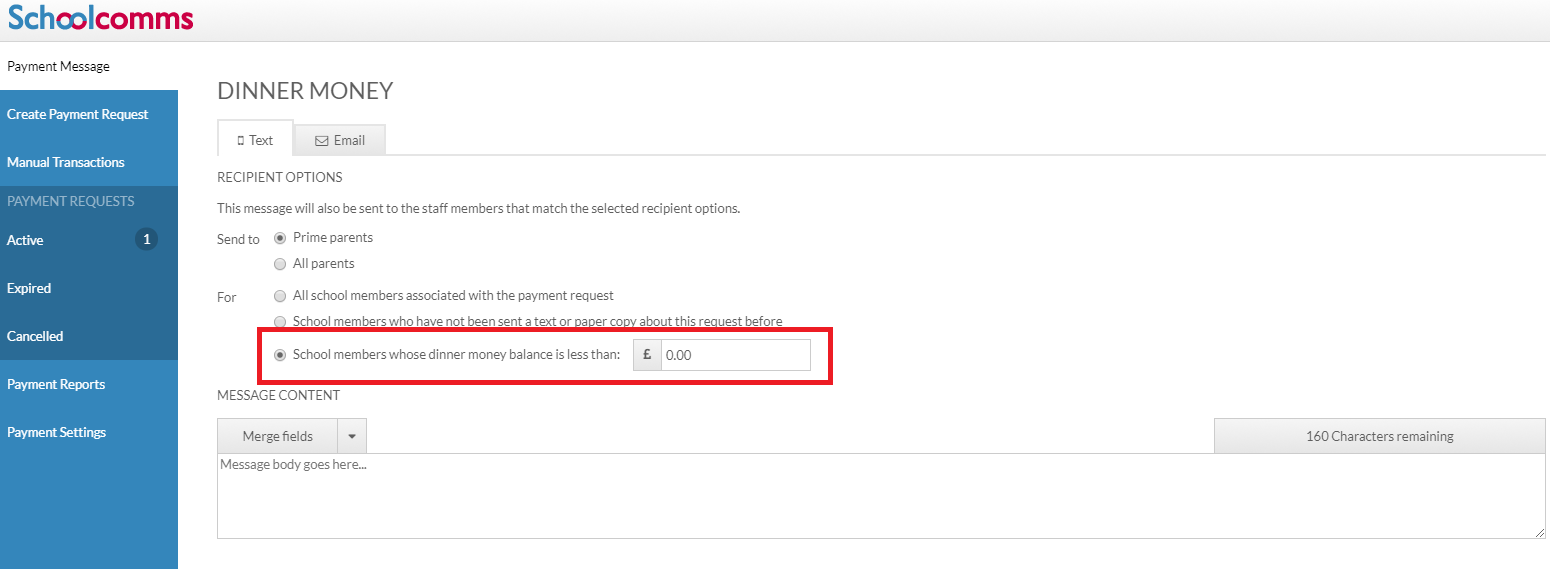
Sending Messages About Payment Requests
- To send a message regarding a payment request, go to Payments > Active Payment Requests, choose the relevant payment request from the list and select Send Message.
- The message can only be sent to those associated with members selected for the payment request.
- Select which type of message you would like to send, Text or Email, and refine who your message will be sent to- if staff are included in the payment request they will automatically be included in the message.
- Then select who the message is for, the options will change depending on the payment request type. The most popular choices are listed below:
- All school members associated with the payment request
- School members for which payments are outstanding
- School members for which payments are overdue
- School members for which parental consent has not been given
- School members whose dinner money balance is below the minimum of : £10.00
- Hint: This amount can be changed by giving the support team a call. Commonly schools just want to contact those who are in debt for dinners, therefore we change the amount to £0
- Type your message in the white box and select Send or Cancel to return to the Payment request screen
- See sent items in Messaging > Sent items to view the delivery/dispatch status of this message.
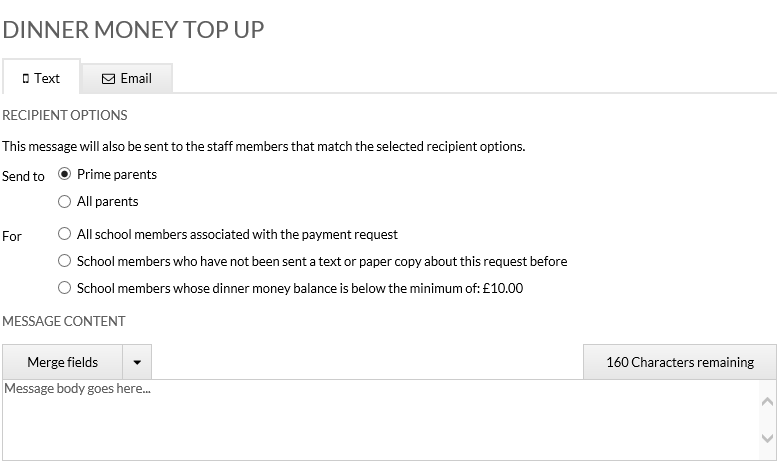
Dinner Money Balance Reminders
Dinner Money Balance Reminders allow you to send messages to those whose Dinner Money balance has fallen below a certain amount. To send out a Balance Reminders please follow the instructions below;
- Within Payments select your Dinner Money payment request from the Active Payment Requests list
- Click Send Message in the right-hand menu
- Select whether you would like to send a Text or an Email at the top of the screen
- Select the recipient option ‘School members whose dinner money balance is less than:’
- Enter an Amount (this can be a negative or positive amount or £0.00
- Compose your message and click Send at the top of the screen
- A message will be sent to the parents of school members whose balance is less than the amount you entered
Low Balance Notifications
The introduction of Automatic Low Balance Notifications means that Schoolcomms automatically reminds those whose Dinner Money Balance has fallen below a specified amount to top up.
To turn on Automatic Notifications, follow the instructions below:
- When creating a Dinner Money or Club payment request within the Create Payment Request screen, there is a section for automatic notifications.
- Tick the checkbox to display an amount field and the notification content.
- Type an amount in the ‘When the balance falls below’ box (if the low balance notification is set to zero, it will only target pupils that are in debt).
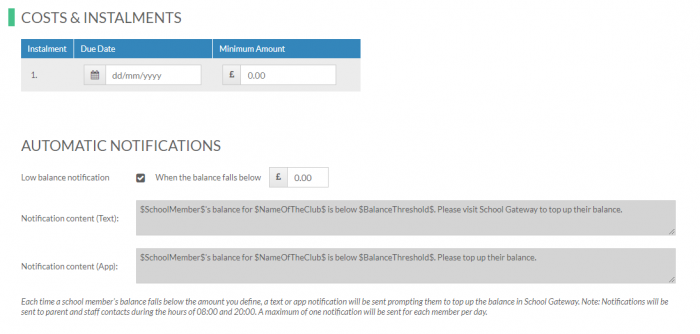
- The notification content is for information purposes only and cannot be amended.
- Complete the Payment Request and click Save.
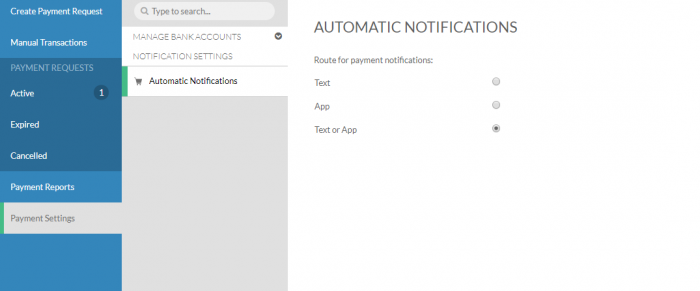
How to configure the notification send route:
- On the Payment Settings screen, click Notification Settings within the left-hand menu.
- Select whether you are happy for notifications to be sent via Text message, App message, or both.
Low Balance notification FAQ:
- Notifications are sent to prime parents and staff self-contacts (if the payment request requires consent, it will only go to parents with parental responsibility).
- Notifications are sent once per day (between 08:00 and 20:00).
- FSM students are excluded from the notifications, providing a current FSM eligibility period has been imported from section 6 of SIMS.
- UIFSM students are not excluded, so these students should not be included in the payment request.
- For SIMS Dinner Money, even if a child only has packed lunches (and is not FSM), if their balance is below the threshold, the parent will still be sent a notification as the packed lunch meal is still counted as a transaction.
- Notifications won’t appear in the school’s Sent Items folder; however, they can be seen in a report via Management Reports (web version) > Messaging > App and SMS messages sent about students in the past month.
Bank Transfer
Why Choose To Pay Using Bank Transfer
Bank Transfer is the easiest and most secure way to pay using School Gateway.
The Bank Transfer set up can either be completed via the School Gateway app or website.
Once the initial set up has been completed, there is no requirement to re-enter bank details each time a payment is processed via School Gateway.
A Bank Transfer is not a Direct Debit. When a payment is made by Bank Transfer on School Gateway, the payment shows in Schoolcomms straight away, however the payment is not debited from the payers account for 3 to 5 working days after the transaction was made. Initial payments can sometimes take up to 10 working days to clear.
The money will never be debited from the payer’s account without the payer authorising every individual transaction via their School Gateway account.
Can Payments Fail?
The most common reason for a payment to fail is if the payer has insufficient funds in their account at the time the monies are debited from their chosen account (3 to 5 working days after the payment is completed in School Gateway).
Some bank account types do not accept the bank transfer facility.
How Do You Know If a Payment Has Failed?
If a payment does ‘fail’ you will be notified via email from the School Gateway team.
The payer will receive an email asking them to make the payment again. No monies will be debited from the payer’s account.
Failed payments are visible in Schoolcomms, within your Payment Reports.
Important Information
You do not need to take any action as Schoolcomms will automatically write back the failed payment(s) and the relevant balance(s) will be adjusted accordingly.
Although backed by the Direct Debit Guarantee, payments are not recurring and will only be debited from a payer’s chosen bank account once a payment has been successfully processed via their School Gateway account.
PayPoint
Pay point allows you to be completely cashless by allowing those people who are unable to access a School Gateway account to pay in various stores across the UK.
To create PayPoint vouchers log into Schoolcomms and click on to Payments > Select the Payment Request > Create PayPoint Voucher.
- Once you have selected your payment request Click on Create PayPoint Voucher on the right-hand side of your screen.
- Select the member that you want to create a voucher for.
- This will load the voucher for you. If you have more than one instalment a voucher per instalment will be created for you.
- You can either print the voucher or email the voucher by making your selection from the right-hand side of the screen.
- If you choose to email the voucher, please select the recipient for your message and then add any text you wish to include in the message.
- When you are ready to send your email, click Send at the bottom right-hand side of the screen.
Remember: All PayPoint payments will be credited to the school by 11am the next working day.
Status Report
- View the status and history of a payment request by highlighting it and selecting Status Report
- Enter a description and select Search to find a particular payment request
- To save the report, select Export or to print the report, select Print
Manual Transactions
VIDEO: Recording Manual Transactions
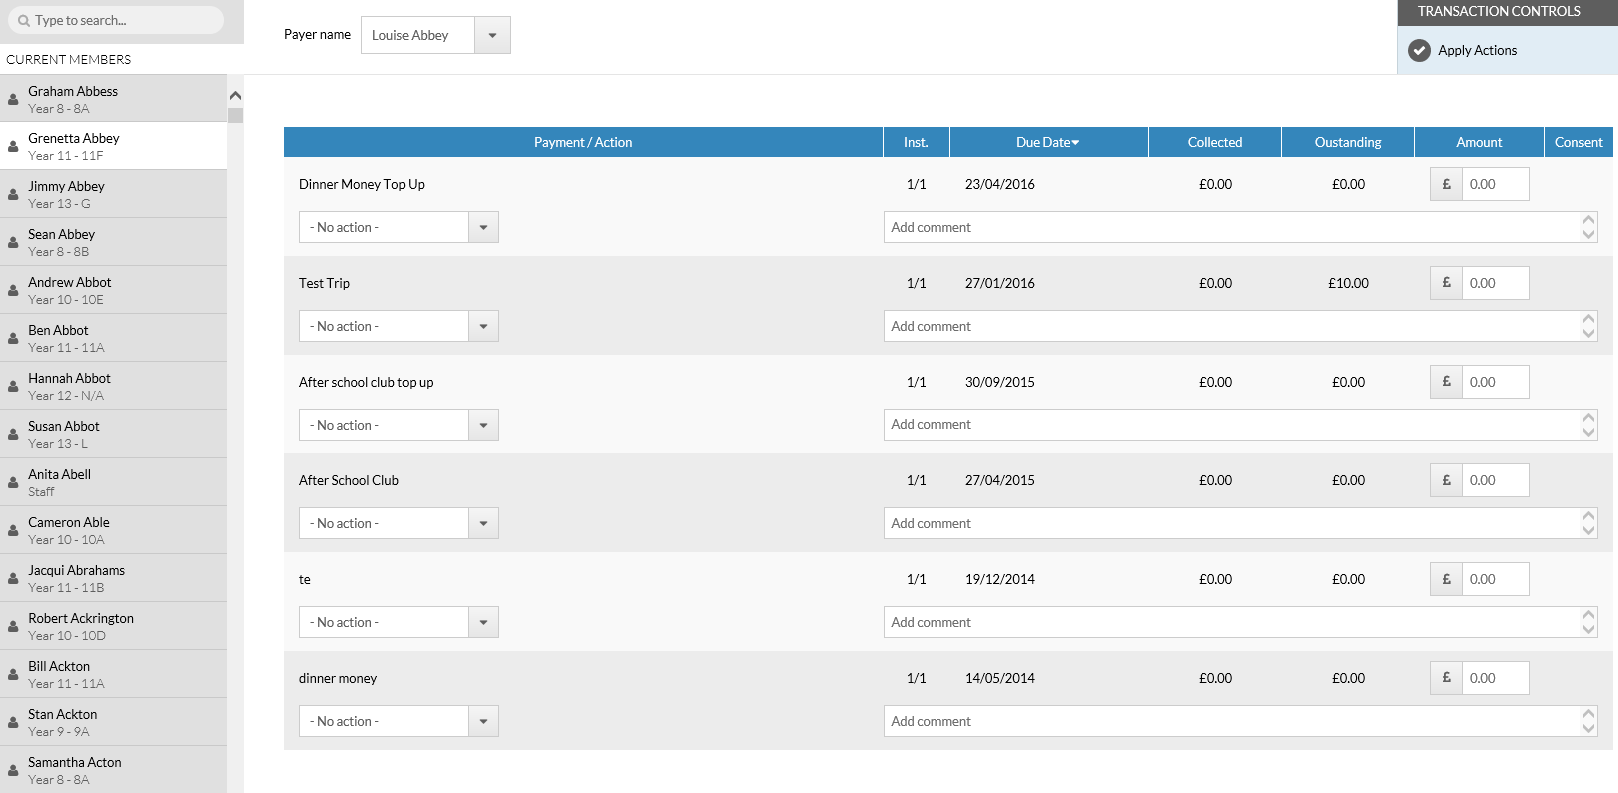
- To process manual transactions, go to Payments > Manual transactions
- Find the student the payment is for in the left hand list.
- If the payment is for a Former Member you can access their details at the bottom of the list.
- At the top of the screen select a Payer from the drop down list.
Hint: By selecting a payer this will send the payer a receipt of the transaction you are going to process via email - Select an action you wish to apply in the Payment/Action column.
- For payments that are outstanding you can select cash, bank transfer, cheque, discretionary allowance, standing order or manual adjustment.
- For payments that have been collected you can choose discretionary allowance, full refund, partial refund or manual adjustment.
- Enter the amount collected, a comment or consent if appropriate.
- You can also enter a comment for the transaction.
- Select Apply actions to confirm and the transaction will be processed.
Please note: Recording a manual refund in Schoolcomms does not return money to the payer, the school will need to issue the payer with cash or cheque or refund the payment online.
Managing Your Bank Accounts
VIDEO: How to Manage Your Bank Accounts
Adding a new bank account
Before you start adding payment requests on your payments system you will need to set up your bank accounts. You can have more than one bank account if there are separate accounts for different payment items e.g. dinner money, milk money, trips.
- Go to Payments > Payment Settings in Schoolcomms
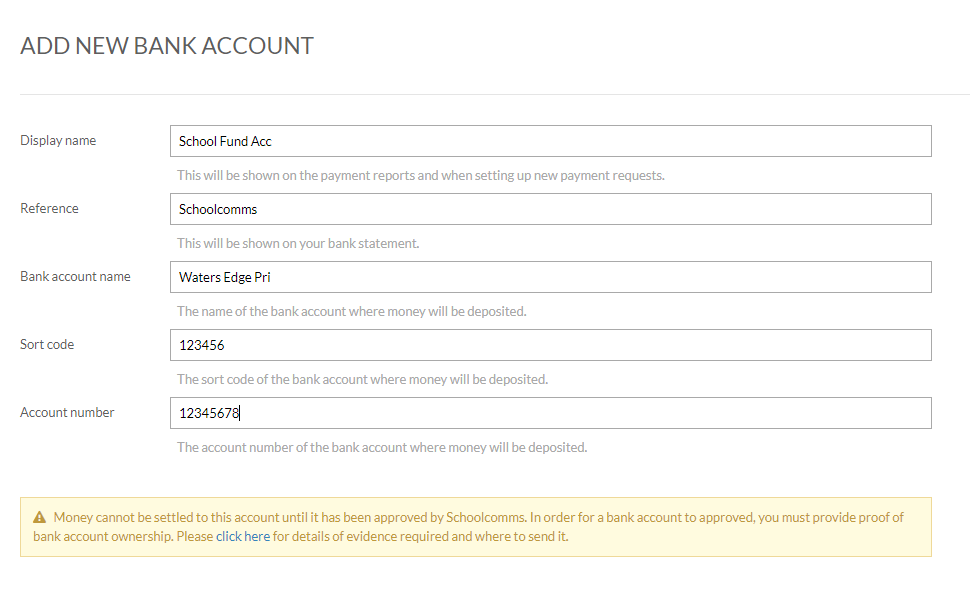
- Press the Add new bank account button
- Enter your details as follows;
Display name: This is what you will see when creating a payment request
Reference: This is what will display on the bank statement when receiving the money from us (If you are using a third-party bank account you may want to identify your school here)
Bank account name: Name of bank account
Sort code: Bank accounts sort code
Account number: Bank accounts number
When you are happy with the details that you have entered, click save
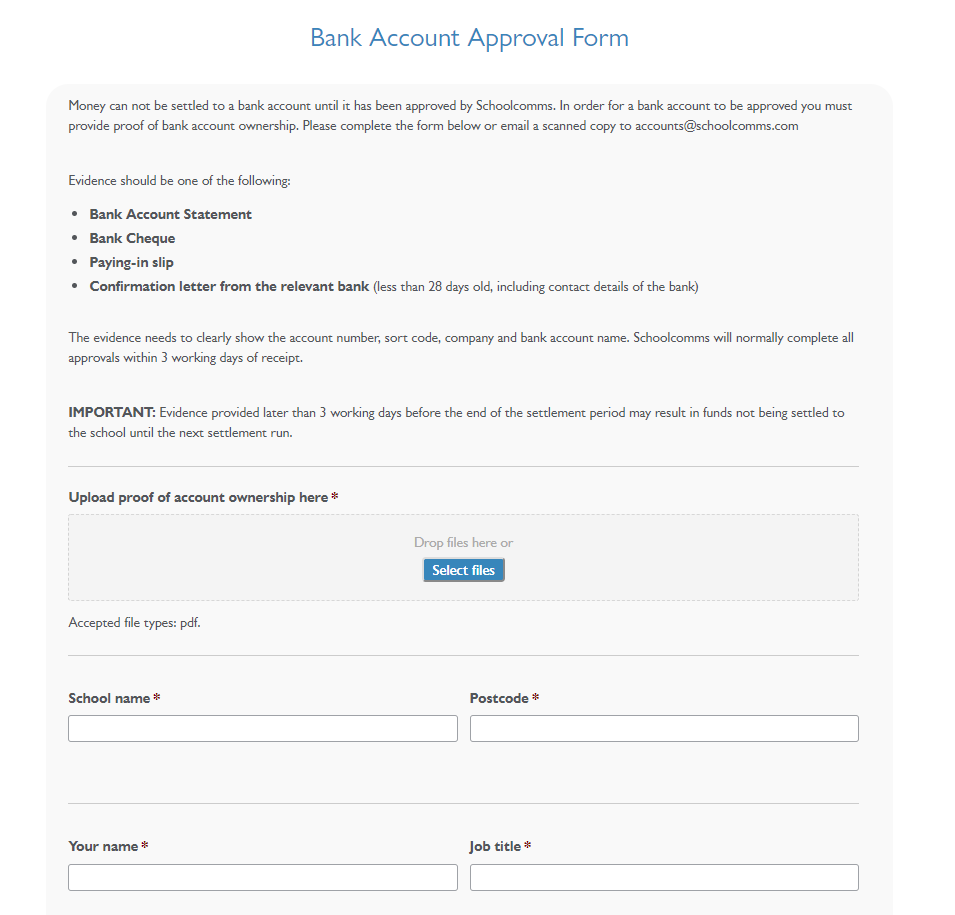
When adding a bank account within Schoolcomms you will see the below message, asking you to provide proof of ownership for the bank account. We require proof of ownership for all bank accounts added to satisfy our fraud rules.
Please note: Until proof of ownership is provided for the bank account, the account will be placed on hold. Whilst the account is on hold no disbursements of collected monies can be made.
Once you have clicked on ‘click here’ within the message above, you will be taken to the following screen where you can upload your proof of ownership, which can be a bank statement, confirmation letter from the bank, blank cheque or paying in slip.
Your details will then be checked by our Finance department and the account will come off hold.
Editing or disabling a bank account
To edit the bank account details that have been set up
- Go to Payments > Payment Settings
- Highlight the account you wish to edit
- You will then see all the bank details
- Make the changes you wish and then click the Save button
- Payment requests currently set up with this bank account will now receive settlements into the changed bank account once it has been approved.
Disable a bank account
To disable an existing bank account
- Go to Payments | Payment Settings in Schoolcomms
- Highlight the account you wish to edit
- Deselect the ‘Enabled?’ tick box.
- Click Save and then Yes on the warning message.
- It is important that you recreate any existing payments requests and select the new bank account.
Reports
To access the reports:
- Log into Schoolcomms and click on Payments > Payment Reports.
- Once you are in Payments select Payment Reports from the left-hand side menu. This will bring up a list of the reports and a description of each report is listed alongside the report name to help you distinguish which report you need.
The reports include:
- Transaction Day Book – This report will display the payments and refunds made between two dates.
- Payment Request Overview –This report will display who’s paid, who has money outstanding, who is overdue for a selected payment request.
- History by school member or payer – This report will display payments or refunds for each school member or payer.
- Settlement Reconciliation – This report will display settlements broken down by payment requests.
- Settlement Transaction details – This report will display the settlements broken down by transaction.
- Settlement by Payment Request – This report will display the total settled by payment request.
- All Overdue amounts – This report will display all overdue amounts for each payment request.
- Audit Trail – This report will show payment actions carried out by each school user. tracks refunds, manual payments, payment requests and edits.
- Unsettled Transactions – This report will display online transactions that are awaiting settlement.
Click on the report you wish to view. To filter on a column, click the Filter icon within the column header and select the drop-down arrow. To save a report select Export or you can print the report by selecting Print in the top right corner.
SIMS Dinner Money and Cashless Caterers
If your school uses SIMS Dinner Money a Schoolcomms import will need to be run in order for dinner money balances to be updated.
If your school uses a Cashless Caterer dinner money balances will update on different time scales depending on which provider you are using.
Please note: A parent must have parental responsibility ticked in SIMS to see dinner money balances on School Gateway.
Refunds
Refund an Online Transaction
This only applies for payments made up to 180 days ago.
To action a refund that has been made on the School Gateway, you will need to go to the Payment Request within Payments, and Click into Online Transaction Refunds.
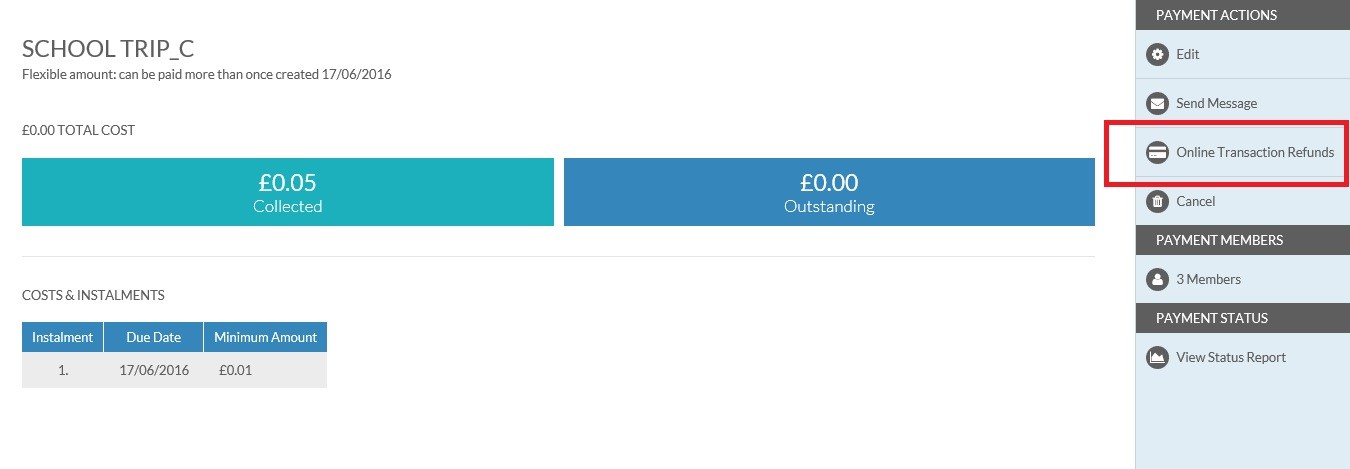
You will now see a list of Online Transactions available for you to refund.
Once you have found the Online Transaction that you would like to refund, click ‘Yes’ next to that Transaction.
If the option is greyed out and you are unable to select ‘Yes’ on a payment you wish to refund, it will mean the payment has not yet cleared from the parent’s bank account, so cannot yet be refunded. Payments can take up to 7 days to clear from the parent’s account, so please wait until this time has elapsed before attempting to issue a refund.
Please Note: If you would like to action a partial refund, you will just need to change the amount that you wish to refund in the Amount column.
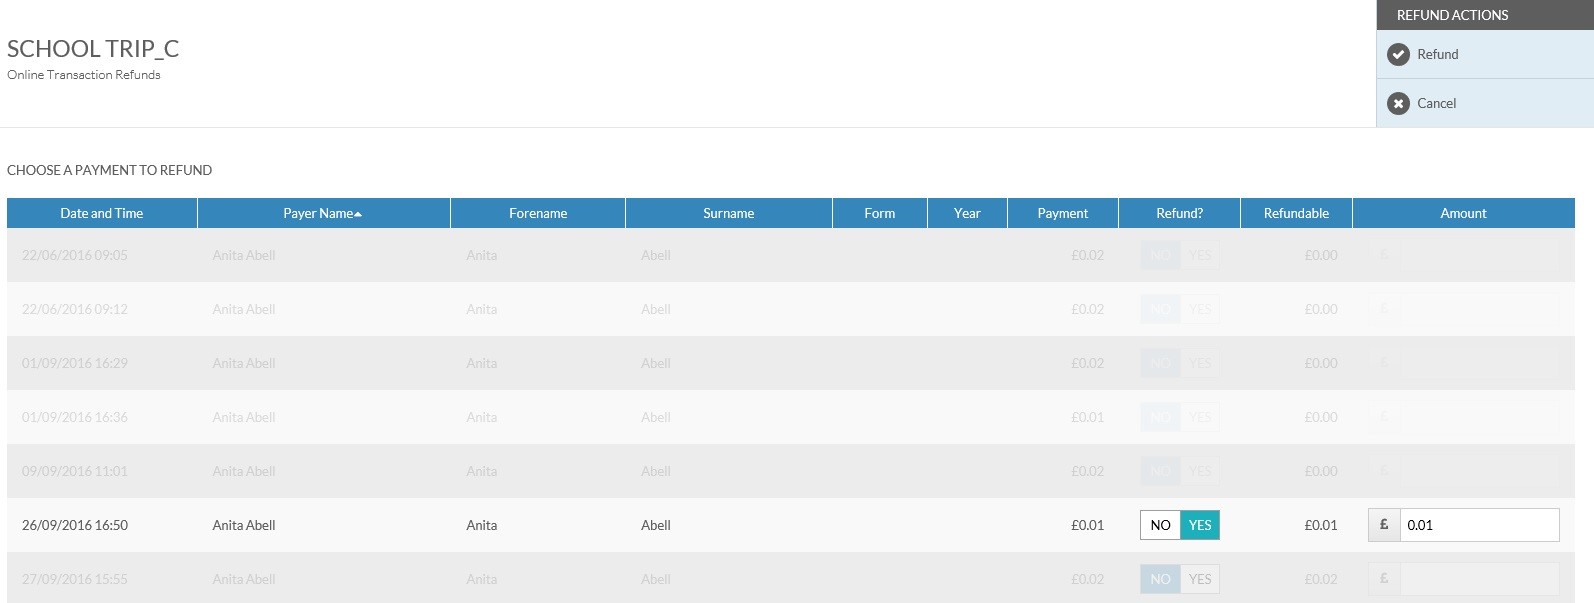
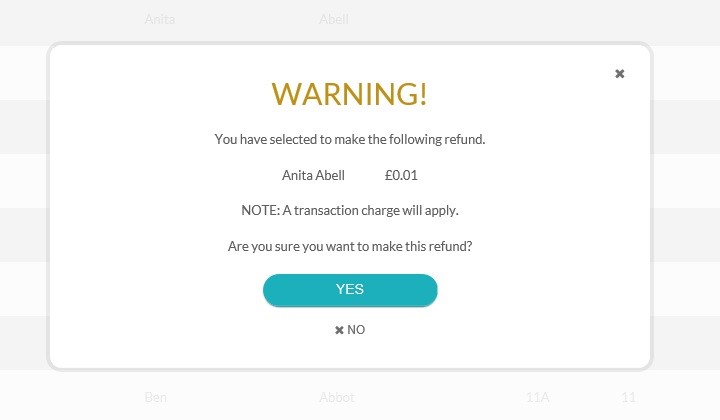
Once you have selected the Online Transaction that you would like to refund, Click ‘Refund’ in the top right hand corner of your screen.
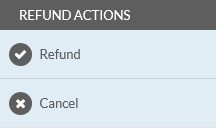
You will then be presented with a warning message asking you to confirm you are sure you would like to process the refund.
It will also remind you that for each Online Transaction that you refund, you will incur a Transaction Charge.
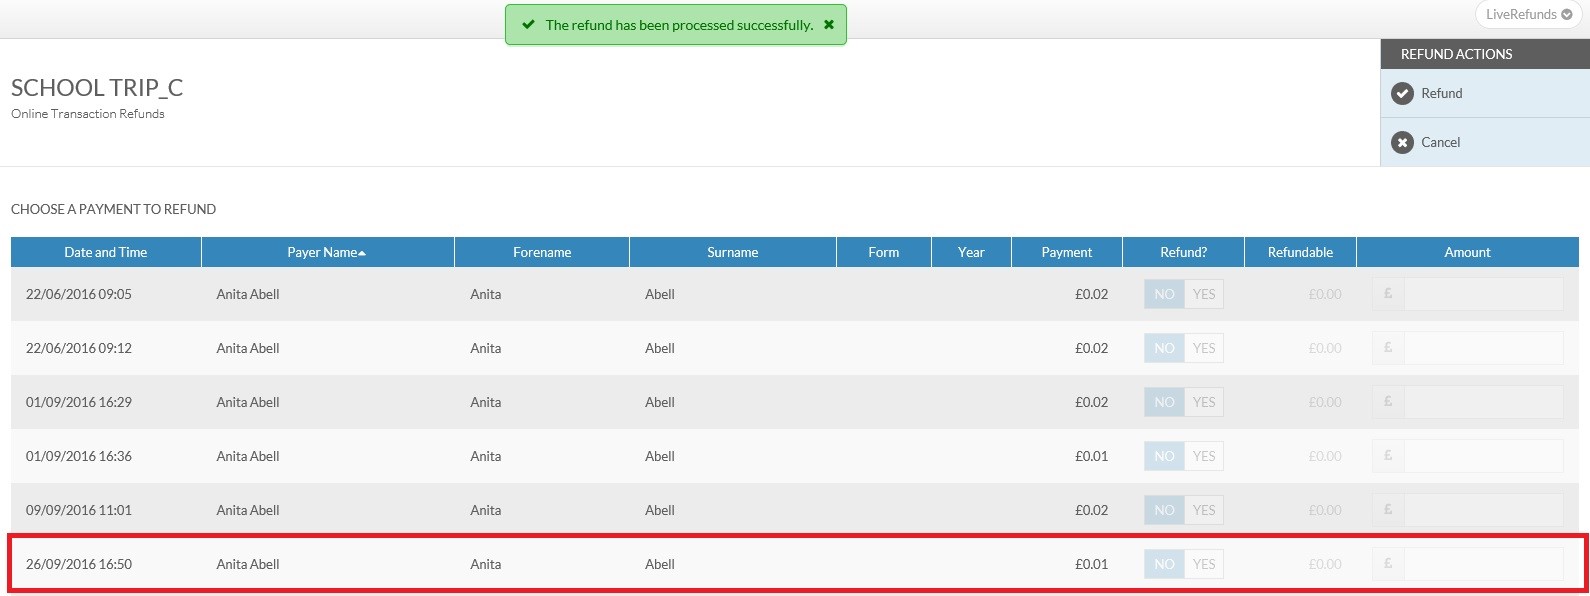
The system will then confirm that your refund has been successful and the Transaction will be greyed out. This is because there is nothing left to refund for that Online Transaction.
However, if you have chosen to do a partial refund, it will display the remaining balance for you, should you wish to refund the remaining balance at a later date.
Any payments made outside of the 180-day window, or payments made with cash, would have to be refunded as a Manual Transaction.
Please find a link below to instructions to assist you in refunding via Manual Transactions:
When refunding via manual transaction, you will need to refund the parent/carer with either cash or cheque.
Please be aware that the manual transaction process is purely an internal accounting procedure and does not refund monies or transfer monies between bank accounts.
Please note: An Online Transaction Refund can take between 3-5 working days to return to the payers bank account’
Refund advice form
Transaction Charges
To access a report to help you understand your Transaction Charge Invoice please follow the instructions below:
- Within Schoolcomms click Management | Management Reports.
- You will see a long list of Management Reports, providing you with lots of useful information. Use the search bar at the top of the screen to search for and find, the Payment Transaction Charges report.
- The report will show you all transaction charges broken down by month and bank account, as well as payment method (credit card, debit card, bank transfer etc.).
- To review the data in more detail and to filter the figures, please click Save to save a copy of the report to your machine.
The transaction charge for all online transactions including refunds is 1.27%