Meal Manager
Cypad allows you to add a catalogue of menu items, build a menu and input special theme days for when your meals offered differ from your regular menu. The instructions below will talk you through building a full menu for parents and students to select meals from.
Access
To access Cypad/Meal Manager, click on the following link: cypad.com/login
To access the Whiteboard, click on the following link: https://classroom.cypad.net/ss1/ or https://classroom.cypad.net/ss2/
If you are unsure of which link to use, you can check this via:
- Cypad/Meal Manager Admin.
- Click on Settings.
- You will then see the link (example below):

Add a New Admin User
Under this section, please add the following info:
To add a new Admin User:
- Login to Cypad/Meal Manager.
- Click on Settings.
- Click on Users.
- In the first box at the bottom next to the plus icon, insert the user’s name.
- In the 2nd box insert their email.
- In the 3rd box across, insert a password.
- Click onto the last box and select ‘open‘.
- Click back onto the user’s name and press the enter/return key on your keyboard, ensuring the new user appears in the table.
- Then save.
Managing Students/Leavers
For any changes made to students or class groups in your MIS Depending on when these changes are imported into Schoolcomms, pupils and class groups will update in Cypad after the next data sync: School members – 6am, 11am, 3pm, and 6pm each day.
Due to how your Cypad account is configured, your student/staff data is obtained directly from Schoolcomms. Although these students are showing as leavers in Schoolcomms (based on the leaving dates entered in your MIS), as they have not been deleted from Schoolcomms, they are still being passed to Cypad as ‘Open’ students.
In order for them to no longer be passed to Cypad (at which point they should change to ‘Closed’ on Cypad), you will need to follow the delete leavers process in Schoolcomms. I have included some instructions below to assist you with this process.
Please find below some useful information to assist you in deleting your leavers:
When should I delete leavers from Schoolcomms?
If a school member has left the school, they will be marked as a leaver the next time the import is run.
Once you have saved any information/messages relating to these members, and you are certain that no payments or club bookings will need to be made by the parent(s), you can remove them from Schoolcomms using the delete leavers process.
Warning!
N.B. Deleting your leavers will permanently remove them from Schoolcomms.
You will no longer be able to send messages to them and any association to your school will be removed from their School Gateway account.
Before deleting your leavers, ensure you have saved any information/messages relating to them and performed any manual transactions/refunds as there will no way of recovering them once deleted from Schoolcomms.
Any personal information which cannot be removed will be anonymised in 14 days, which will show as XXXX in your Schoolcomms reports.
Should you wish to extend the anonymised period, please click here.
How do I delete a leaver from Schoolcomms?
To delete leavers in Schoolcomms, click Management > Import Management. You will see Delete Leavers, select this option, and highlight the members you want to delete in the left-hand box and select Add. Now click OK to confirm the members for deletion.
Note: When the delete leavers process is followed and you receive the success message, the leavers will be queued for deletion from our database, so you may continue to see members who are in the process of being deleted for a short period of time until they are removed (this timescale will depend on the number of leavers being deleted).
Key Times
Please find below some useful information on key times:
Parent pre-orders:
- Cut-off time is determined by the Parent pre-order cut off time in Cypad > Settings > Site Info > Whiteboard.
Whiteboard:
- Recording selections for current day – 12pm.
- You can still access the whiteboard after 12pm to record PM attendance (if enabled).
Pre-orders tab for current day (e.g., adding/removing pre-orders manually):
- Only available until 12pm (greyed out afterwards).
Transactions tab for current day (e.g., adding meals retrospectively that weren’t pre-ordered):
- If you have a tablet – only accessible the following day (so any meals for the current day that weren’t pre-ordered need to be added to the tablet and a sync run, otherwise they can only be added the following day).
- If you don’t have a tablet – accessible all day but you should still record any pre-orders via the pre-orders tab to ensure your meal selection reports populate correctly.
When do meals get confirmed/charged?
- If you have a tablet– when the meals are confirmed on the tablet and a sync is run on the tablet (manual process).
- If you don’t have a tablet– automated process at 3pm each day (you can manually apply pre-orders earlier in the day via Transactions tab if needed).
Data sync between Schoolcomms and Cypad:
- School members (if you use the Schoolcomms API) – 6am, 11am, 3pm, and 6pm each day.
- Payments/balances – every 20-30 minutes.
Adding Menu Items
The first step is to create a catalogue of meals within Cypad, which will be the basis of your school menu.
- Click Cypad in the top left-hand corner and select Menus from the drop-down list.
- Click into Items at the top of your screen. Now click Add within the Items screen. The Add Menu Item screen will now display.
Go through and fill in the Menu ID, Name and Description fields.
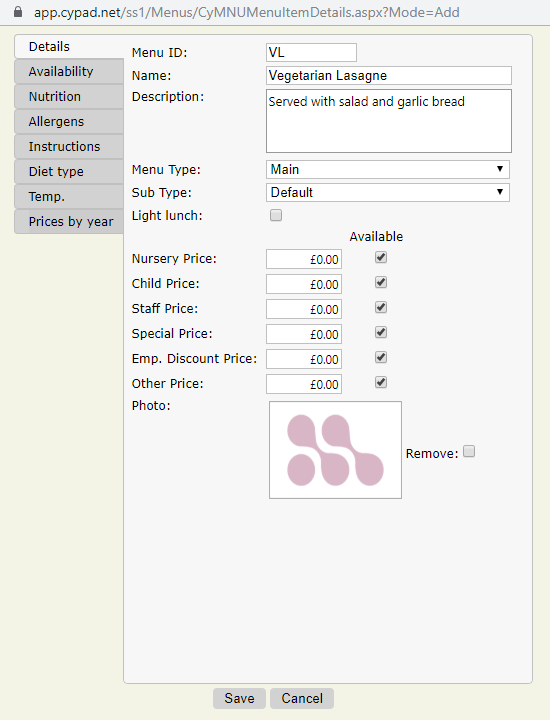
- Select Main from the Menu Type drop-down list. Cypad will now automatically assign your default meal price to this Menu Item. If the price of this item is different, you can enter an ad-hoc price in the amount sections below. If you are creating a free meal such as a home packed lunch, you can remove the price so the box is blank. You will also need to change the default meal ‘type’ to the correct option.
- If you would like to upload a photo of the Meal Item, you can upload in the large box below.
- Now that you have added all the mandatory information you will be able to click Save. If you would like to add Allergen or Nutritional information for this item, please click into the appropriate tab on the left-hand side of the screen and fill in the details.
Building the Menu
Once you have added all the Menu Items you can build your menu, so Cypad knows which meals to offer on which days. If you have a three-week menu in school, you will need to add three menus.
- Click Cypad in the top left-hand corner and select Menus from the drop-down list.
- Click into Menus at the top of your screen. You should now see a Lunch option on the left-hand side of your screen. Double click on Lunch, the option to Add Menu will now appear.
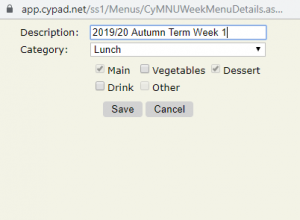
- Once you have clicked Add Menu you will be asked to name the menu. You may wish to call your menu Week 1, and then follow the same pattern depending on how your menu rotation works.
- Your menu will now appear on the left-hand side of the screen. Click on the menu, and you will see all of your previously added Menu Items appear alongside each day, Monday to Friday. You can now drag and drop the right meals on to the right days.
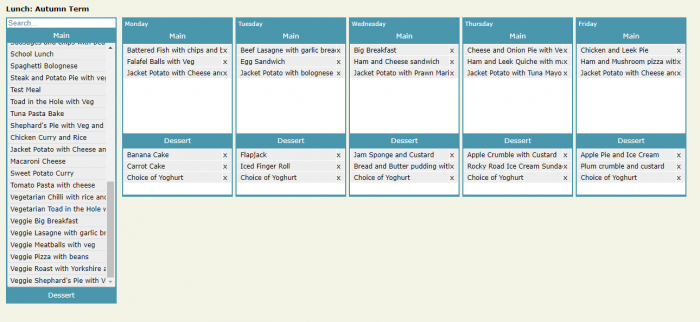
- Once you are happy with the meals you have added, click Save at the top of the screen.
Creating Your Menu Template
The next step is to build your menu template, so Cypad is aware of your menu rotation, and offers the right menu week on the correct calendar week.
Click Cypad in the top left-hand corner and select Menus from the drop-down list.
- Click into Templates at the top of your screen. You should now see your school name on the left-hand side of the screen. Click on the school name and all of the upcoming school weeks will be listed.
- Alongside the school weeks you will see your weekly menus. You can now drag and drop the right weekly menu on to the right calendar week, leaving out school holidays.
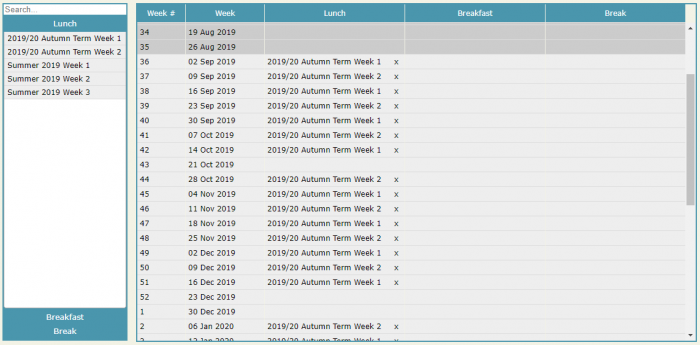
- Once you have added all the weeks to the calendar click Save at the top of the screen.
Cypad will now know which meals to offer on which days of which week.
Creating Theme Days
You may sometimes offer meals that are different to those listed on your menu. By adding a Theme Day, Cypad will offer these meals instead of the default meals on your menu. You can also use Theme Days to stop Cypad offering menus on Non-Pupil days.
- Click Cypad in the top left-hand corner and select Menus from the drop-down list.
- Click into Menus at the top of your screen. You should now see a Theme Days option on the left-hand side of your screen. Double click on Theme Days, the option to Add Theme Day will now appear, and you will be asked to give the Theme Day a name.
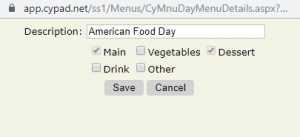
- Your Theme Day will now appear on the left-hand side of the screen. Click on the Theme Day, and you will see all of your previously added Menu Items appear alongside the day. You can now drag and drop the right meals on to the day.
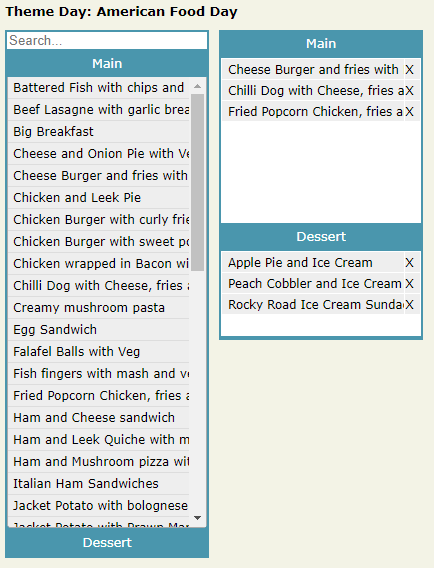
- Once you are happy with the meals you have added, click Save at the top of the screen.
If you are creating a Theme Day for use on a Non-Pupil day, you can leave the meals section blank.
Adding Theme Days to the Calendar
- Click Cypad in the top left-hand corner and select Menus from the drop-down list.
- Click into Calendar at the top of your screen.
- The current month will open, and you can click through to view future months.
- To the left of the calendar you should see any Theme Days you have created. You can now drag and drop the Theme Days on to the right days.
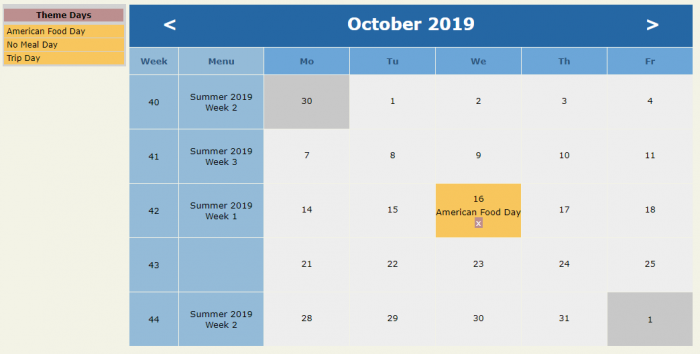
- Once you are happy with the Theme Days you have added, click Save at the top of the screen.
Allergies and Diet Types
Adding Allergen and Diet Information to Meal Items
When creating Meal Items within Cypad, you can add Allergen and Diet information to the item. This information will then be visible to parents when booking meals via School Gateway. If Allergies and Diet Types are also recorded against students, Cypad won’t allow a booking to be made for an item that contains an element a child is allergic to, or that doesn’t meet their diet type.
To add this information to your Meal Items, open the Menu page and select Items. Click on to the item you wish to add allergen information for. A pop up screen will appear for the selected item.

You will see several tabs on the left hand side of the window.
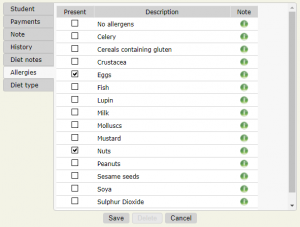
The Allergens tab contains a checklist of the 14 most common dietary allergens and an option for No Allergens if a menu item does not have any known allergens. Use the Present column tick boxes to record the present allergens then click Save.
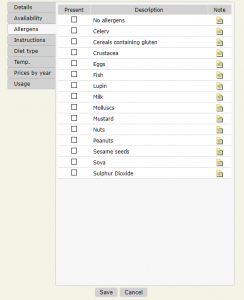
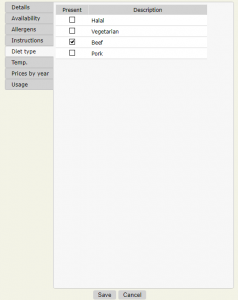
The Diet type tab contains a check list of dietary restrictions for cultural or religious purposes (e.g. Halal, No Beef, No Pork). Use the tick boxes in the Present column to record if the meal item is suitable for a certain diet type, then click Save.
Recording Allergy and Diet Information Against Students
To ensure that Cypad doesn’t allow a student to order a meal they are allergic to or doesn’t meet their diet type, allergy and diet information will need to be added to the student record within Cypad, as this information will not be imported from your MIS.
To add the information to a student record, open the Meals screen and select Students. You will see a list of all students.

Click on to a student’s name. This will open a pop up window.
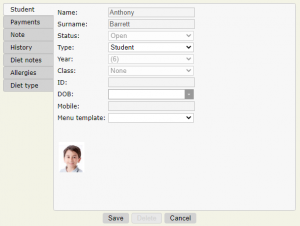
On the left hand side of the pop up window, you will see the Allergies and Diet type tabs. Click in to the tabs and you will see tick boxes allowing your to record an allergy or diet type the student may have.
Once you have ticked the boxes, click Save. This will update the child’s record.
Duty Meal
You are able to mark a meal as being a ‘duty meal’ within Cypad. However, this can only be recorded via the Transactions tab after the meal has been confirmed (after 3pm if your school does not have a tablet or the following day if your school does have a tablet).
- Navigate to Cypad > Meals > Transactions and find the relevant staff member.
- Click on the checkbox for the day the duty meal needs to be recorded for.
- Select the meal choice if it has not already been selected.
- Tick the ‘Duty meal’ checkbox in the top-right of the pop-up window (please note you may need to extend the size of the window for this to appear) and click Save.
- Any charges will then be removed for this meal.
If the staff member needs to pre-order the meal, it would not be possible to do so via School Gateway, as they will still be required to make a payment.
However, you would be able to manually enter the pre-order via Cypad > Meals > Pre-orders so that it shows on your meal selection reports as normal, and then mark it as a duty meal once it is confirmed using the above instructions.
FSM/UIFSM
Schoolcomms reads the FSM eligibility from SIMS, so this will need to be entered in Section 6 of the child’s SIMS record – you will need to enter the eligibility dates under the “Eligible for Free Meals” heading.
For Arbor/ScholarPack schools please ensure the FSM eligibility data is correct in your MIS.
Data sync between Schoolcomms and Cypad
- School members – 6am, 11am, 3pm, and 6pm each day.
The FSM eligibility would then show in Cypad (you can see this in Cypad via the Students tab – there is a column showing whether the child is eligible for FSM or not).
To ensure that UIFSM meals are charged correctly on your first day of term, please ensure you run an import in Schoolcomms before 11am so that the updated year groups will be passed to Cypad.
Making Amendments to your Menu
You may sometimes need to amend the meals being offered within your Meal Manager system. The steps below will talk you through removing individual meals and entire menu weeks.
Remove a Menu Week from the Calendar
- Click Cypad in the top left-hand corner and select Menus
- Select Templates at the top of the screen. You should now see your school name on the left-hand side of the screen. Click your school name and all of the upcoming menu weeks will be listed
- Alongside the school weeks, you will see your weekly menus in rotation. Click the cross to the right of the menu week to remove it from the rotation
- Once you are happy with the changes click Save at the top of the screen
Note: You cannot remove the current menu week.
Removing an Item from the Menu
- Click Cypad in the top left-hand corner and select Menus
- Click on the menu week you wish to amend on the left hand side of the screen. All of your previously added meal items will appear under each day
- Click the cross next to the item to remove it from the menu
- At this point you can also add meals from the left hand list if needed
- Once you are happy with the amendments click Save at the top of the screen
Note: Changing menu items will remove any pre-orders for that day.
Classroom Whiteboard Selection
Whiteboard Selection
Whiteboard Selection allows Teachers or children to make meal selections within the classroom each morning.
- Login to the classroom area. Your Cypad admin user will be able to provide you with the necessary link and login credentials.
- All of the classes at your school will be displayed, click on the class you wish to access.

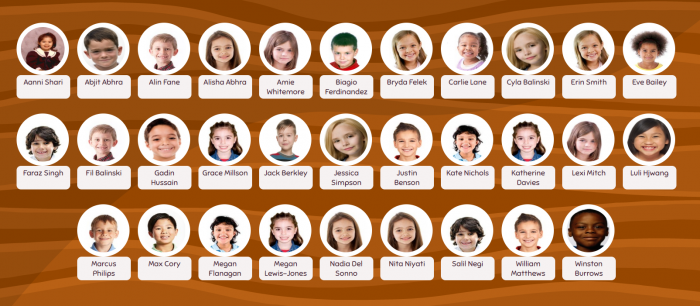
- Children who are members of the class will now be displayed, the system may show a photo of the child alongside their name, depending on your school’s settings. Click on the child you wish to make a meal selection for.
- Today’s available meals will now be displayed, click on the options the child would like and then click OK.
- The child’s name will now be listed in green, meaning a selection has been made and saved for this child.
Please note if you would like to change a booking for a child, hold down the control key (CTRL) on your keyboard and click on the student.
Admin Meal Selection
Sometimes it may be necessary to make a meal selection from the Admin area of Cypad. The following two sections will explain how to do this either before or after lunch service.
Admin Meal Selection Before Lunch Service
- Click Cypad in the top left-hand corner and select Meals
- At the top of the screen select Pre-orders
- Select the appropriate date range using the selector and/or arrows at the top of the screen
- Search for the child’s name you wish to make a booking for
- To select the meal, click on the tick box for the correct day and select the meal choice from the pop-up window. Click Save to confirm the meal choice
Admin Meal Selection After Lunch Service
- Click Cypad in the top left-hand corner and select Meals
- At the top of the screen select Transactions
- Select the appropriate date range using the selector and/or arrows at the top of the screen
- Search for the child’s name you wish to make a booking for
- To select the meal, click on the tick box for the correct day and select the meal choice from the pop-up window. Click Save to confirm the meal was taken, this will automatically update the child’s lunch money balance
Changing/Removing a Child's Booking
- Click Cypad in the top left-hand corner and select Meals
- At the top of the screen select Transactions
- Select the appropriate date range using the selector and/or arrows at the top of the screen
- Search for the child’s name you wish to amend – there should be a tick in the tick box for that day
- To change the meal click the tick box and re-select a meal choice from the pop up window
- To remove the meal click the tick box and de-select the meal choice from the pop up window
- Click Save to confirm the amendment/cancellation
Note: If a meal is removed, the child’s balance will be updated accordingly.
Reports
There are many reports within the Cypad system, to provide you with information such as daily meal bookings, student balances and more. See a breakdown of the most popular reports below:
To find the reports please go to: Meals > Students > Reports
Tick list (class/year) (PDF/Excel) – shows a list of all children (including any diet notes, diet types and allergies) along with their menu choices. Please note that this does not show any special menu items, if ordered
Meals selected (class/year) (PDF/Excel) – shows list of children and their bookings (main and dessert). Please note this does not show diet notes, diet types or allergies
Meal selection summary – shows totals for each menu choice (main and dessert) for a particular day, along with weekly meal numbers (paid and free). Please refer to the analysis reports below if you need to export this data.
Student allergies (Excel) – shows all children and whether they have any allergies assigned to them in Cypad
Student dietary requirements (Excel) – shows all children and whether they have any diet types assigned to them in Cypad
Students with allergies or dietary requirements (Excel) – combination of the above two reports, and also shows diet notes
Initial balances template (Excel) – this is only typically required before you go live with Cypad, and is also useful for finding a child’s MISID
Further reports can also be found within: Meals > Analysis (all can be exported to Excel)
Meal numbers by Day / Year Group / Key Stage – shows total paid meals and free meals, and whether these free meals were UIFSM or Pupil Premium, across a day/week/date range. Only populated once meals are confirmed (i.e. after 3pm or if you have a tablet, when it is synced after service)
UIFSM by Year Group – shows total UIFSM meals across a day/week/date range, split by year group. Only populated once meals are confirmed (i.e. after 3pm or if you have a tablet, when it is synced after service)
Pupil Premium Meals by Year Group – shows total FSM meals across a day/week/date range, split by year group. Only populated once meals are confirmed (i.e. after 3pm or if you have a tablet, when it is synced after service)
Selection Summary – shows totals for each menu choice (main and dessert), across a day/week/date range. This can also be filtered by year or class group
Meal income (all, year or key stage) – shows total income based on all meals marked as taken, across a day/week/date range