Dinners
Dinners
Dinners FAQs
Creating a Meal Plan for your School
Schoolcomms:
- Click on Dinners > Create Dinner Plan
- Name of Dinner Plan – This is where you can add the name of you meal plan and this is what will be displayed on School Gateway
- To select members, use the list on the left of the screen and highlight the member(s)/group(s) from the list and click Add; The selected members will be moved to the right-hand side box
- When you are happy with your selection click Save. Alternatively, click Cancel to return to the Manage Dinners screen
- The template for your Dinner plan is now created. Now you will need to create some menus
Add a one-off menu option
You may sometimes need to add additional meal options to your usual dinner menu, such as a Christmas dinner.
The simplest way to do this would be to add a new week to the Dinner Plan by following the steps below:
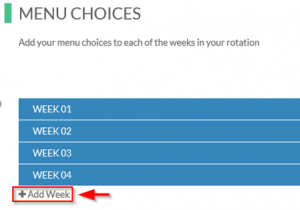
- Click Dinners > Select your Dinner plan > Manage Menu
- Once you are in your Dinner Plan, click on Manage Menu from the right-hand side menu
- To add additional weeks, click Add Week and create your next week’s menu choices
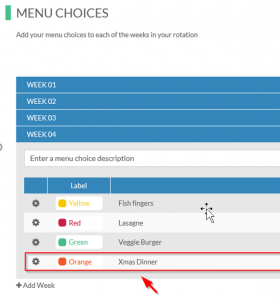
- Add a menu choice and add a label for your menu choice if you wish (this is optional)
- If you do not have a menu choice, you can just add a label. You must allocate your menu to the days of the week. Click on the Rotation Icon and choose the days of the week you want this meal on; these will then appear when you apply them to the calendar later.
- Now you need to add your weeks to the Calendar, so set your date range to your required dates
- Select the week you want from the calendar below, making sure to remove the days there is no service. By clicking on the blue day or week, you do not want to create a meal for and it will then turn grey.
- Click on Select Week and choose the week you want to allocate.
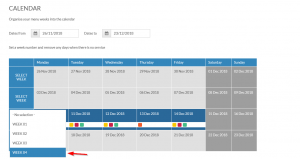
- Once you are happy with your selection, click Save on the top right corner.
If you have already applied your meal plan to the week you need to, add the Christmas meal by creating a new meal plan with the one-off Christmas Meal on the day required. Then add that week to the calendar:
You will need to remove the original menu showing for that day via the original Meal Plan, to do this:
- Click Dinners > Select your original Dinner plan > Manage Menu
- Select the Week you want to remove the day from on the calendar below, making sure to remove the day/s the Christmas Meal has been applied on your new Meal Plan. Do this by clicking on the blue day you do not want the original meal selection showing for, and it will then turn grey.
- Once you are happy with your selection, click Save on the top right corner
You would then need to create a new meal plan with the one-off Christmas Meal on the day required and add that week to the calendar:
- Click on Dinners > Create Dinner Plan
- Name of Dinner Plan – this is where you can add the name of your meal plan and this is what will be displayed on School Gateway
- To select members, use the list on the left of the screen and highlight the member(s)/group(s) from the list and click Add; the selected members will be moved to the right-hand side box
- When you are happy with your selection, click Alternatively; click Cancel to return to the Manage Dinners screen
- The template for your Dinner plan is now created. Now you will need to create some menus
Create your menu:
- Click Dinners > Select your Dinner plan > Manage Menu
- Once you are in your Dinner Plan, click Manage Menu on from the right-hand side menu
- Add a menu choice and add a label for your menu choice if you wish (this is optional). If you do not have a menu choice, you can just add a label.
- You must allocate your menu to the days of the week. Click on the Rotation Icon and choose the days of the week you want this meal on so that these will then appear when you apply them to the calendar later
- Once you have completed these steps, click Add to save your choice
- Now you need to add your week to the Calendar. Set your date range to your required date.
- Select the week you want from the calendar below
- Click on Select Week and chose the week you want to allocate
- Once you are happy with your selection, click Save on the top right corner
Below are some steps to resolve issues that may occur when adding additional meal items:
- If the One-off menu choice will be chargeable for all pupils (i.e. Free school Meals who are not on the current dinner plan etc), you will need to remove the Menu Choices for that day and create a new Dinner Plan with the One-off Meal Choice and apply to the day required
- If you have already applied your menu for the week that you require the one-off menu choice, but no bookings have been made, you would need to add a new Week as instructed previously, then in the calendar you would need to click on the desired week and amend it to show the new week
- If bookings have already been made for the day of the one-off menu choice, you will need to apply the new week as advised above, then either cancel so the parents can re-book or amend the meal choice for that day.
School Gateway settings for Dinners
Changing how your parents interact with your Dinners in School Gateway
Once your Dinners is set up you want to change how your parents can interact with Dinners via School Gateway, e.g. see what has been booked, can they make a booking if so when can they make a booking.
Click on Dinners>Select Dinner Plan> School Gateway Settings
- Click on School Gateway Settings on the right-hand side of the screen. This will display your current settings
- If you want parents/staff to be able to view Dinners on School Gateway click in the box Parents/ Staff can view meals
- If you want parents/staff to book online click in the box Parents/Staff can book meals
- You can then select when they can book the meal by clicking the relevant box
- If you want to apply Free School meals click the box
- Once you are happy with your selection click Save on the top right corner
Creating a Dinners Payment Request
Schoolcomms:
- Click Dinners > Select the Dinner Plan > Create Payment Request
- The name of the Dinner Plan is already selected, the type of payment is by default Schoolcomms Dinners flex: can be paid more than once
- The payment request is linked to the Dinner Plan, this means that once a payment is made it will automatically update the members balance in Dinners and on the School Gateway
- Visibility – Input the dates you want your parents to be able to see the item to pay against via their School Gateway.
- Event date? – you do not need to use this
- Additional information and consent guidance – Input any information that you feel your parents need to know when making a payment. OR ask a question of your parents in this box
- Require payer comment? – If you have asked a question of your Parent in the box above you can use this box to prompt an answer
- Bank account – Select the bank account you want Schoolcomms to deposit the money into when you parents pay online
- Cost centre – If you use and internal cost centre and you would like this appearing on your reports in Schoolcomms please input it here
- Costs & Installments – input the Due date – This is date you want your parents to pay by. Amount input the minimum amount you want your parents to pay. Please note, once one parent has added this item into their basket this section cannot be amended
- The members of your Dinner Plan are automatically added into the payment request
- If you need to remove a member from the payment request so they cannot pay for a meal click on the small cross next to their name
- Once you are happy the details are correct click Save on the top right corner of your screen
Changing bookings for your members
Ideally your parents will be booking their meal choices through School Gateway, however, there may be occasions when they need to amend or cancel their booking. If this is the case they will need to contact you in school so that you can make any amendments. This means you keep control of your Dinners in school.
Log into Schoolcomms and click on Dinners > select your Dinner Plan
- Once you have selected your Dinner Plan, click on Manage Bookings from the right-hand side menu
- Select the day that you want to make an amendment for, from the left-hand side of the screen. You can select from future or past bookings.
- Find the member that you want to make an amendment for
- To amend a menu choice, click on the pencil icon, select your new choice and click on the tick icon. You will then see a warning message asking you to confirm – please click Yes if you want to save your changes. A credit will be applied to the child’s balance to reverse the original booking, and then a charge will be applied for the new booking.
- To cancel a booking, click on the dustbin icon. You will then see a warning message asking you to confirm – please click Yes if you want to save your changes. A credit will then be applied to the child’s balance to reverse the original charge.
Recording an opening balance for your Dinners
Once your Dinners has been created and before you make it visible to your parents you may wish to record opening balances if you have already been taking money outside of Schoolcomms for your Dinners.
Log into Schoolcomms and click on Dinners > Record Charges
- Once you are in Dinners click on Record Charges from the menu on the left-hand side of your screen
- Select the Dinner plan you want to record the charge for, from the list on the left-hand side of the screen
- Under the members name you wish record and amount for click in the No Action box
- Select if you wish to record a credit (positive balance) or a charge (negative balance)
- Add the amount of the balance into the amount box
- Repeat this process until you have added all the balances you need to. Once you are happy click Apply Actions on the top right corner and this will save the changes and update the balances for Dinners and in School Gateway
Dinners Reports
Within your Dinner system you have a series of reports which will help you manage your Dinners and keep track of the balance. Below is a list of the reports that you will be able to access and a brief outline of what they contain.
- Log into Schoolcomms and click on Dinner > Dinner Reports
- Once you are in Dinners select Dinner Reports from the left-hand side menu
- This will bring up a list of the reports and a description of each report is listed alongside the report name to help you distinguish which report you need
- The reports include:
- Weekly meal numbers – This will display the totals of billed meals, free school meals and universal free school meal for each day in the period selected
- Dinner balances – This report will list all the dinner balances for all members
- Dinner transactions – This report will list all the dinner transactions
- Click on the report you wish to view
- To filter on a column, click the Filter icon within the column header and select the drop-down arrow
- To save a report select Export or print the report by selecting Print on the top right corner