Frequently Asked
Messaging
How do I order text credits?
Please find direct links below to assist you with ordering text credits:
Where can I find a report for Text Credit Purchase History?
Dashboard > Management > Management Reports > Search Text Credits > Text Credit Purchase History.
How do I send an app message to a parent?
For a member to receive an app message they must be logged into the app. If they aren’t logged into the app, they will receive a text message.
To send an app message:
- Go to Messaging.
- Click Send a Text.
- If Send by box shows App/Text – this will send an App message to those logged in and a Text to those who are not.
- If Send by box shows App – this will only send an App message to those logged in and those who are not will appear on your Paper list.
How can I see if an email/text has gone to all the recipients?
To check the Delivery/Dispatch status of a message sent through Schoolcomms, you will need to check your Sent items in Messaging. You are able to do this in Schoolcomms via the desktop version Delivery Status Desktop or via the web version Delivery Status Web.
Please note that you are only able to view the delivery/dispatch status details for messages sent in the past month.
Why have I had a message regarding remaining storage space?
If you are unable to send a message, or you see a message regarding the remaining storage space available within your Schoolcomms account, you may need to archive or delete some of your Sent Items.
The facility to delete sent messages is only currently available via the web version of Schoolcomms.
Please find the direct links below to assist you with archiving your messages:
Why do I have so many drafts in my draft box when I’m not making drafts?
Each time you click into Send Message, Schoolcomms will create two blank drafts (two blank drafts will always be displayed by default).
Please find a direct link below to assist you with managing your drafts:
Can I send a message to both parents?
You can message both parents if they are being imported from SIMS (depending on their Priority number). You can check your import settings on the Desktop version of Schoolcomms: Import Settings.
- Go to Management.
- Click Edit Settings.
View the setting under the Student Family Contact area – if you want to import more contacts, click the change button and view the help page before processing the change.
Alternatively, if you want to import an additional contact (separate to your import settings above) for one child, you can do this in the Desktop version of Schoolcomms:
- Go to School Members and Group.
- In School Members, search for the child.
- Click Linked People at the top of the screen to view the contact currently being imported.
- Click New from SIMS at the bottom of the screen, this will show the additional contacts in SIMS.
- Select the new contact and click OK.
The new contact will come into Schoolcomms as a non-prime Parent, so when you are sending a message to include this contact, you will need to un-tick Send to Prime Parent or select Send to All Contacts.
Why is a parent not receiving emails?
There may be a few simple reasons a parent does not get an email please can you check the following:
- Go to Dashboard.
- Click Linked People and search for the parent.
- Do they have an email address? If not, add this into SIMS and run the import in Schoolcomms.
- If they have an email address, is it disabled? If so, this may be showing in your Data Issues, as emails may have bounced or gone into Spam. You can enable the email address on the right-hand side, but only do this once you have confirmed the details with the parent and advised them to add your Schoolcomms email address to their address book so it does not happen again.
If you sent the message to Prime Parents, make sure the parent is showing as a Prime Parent.
To view the dispatch status for the message less than a month old:
How can I message only one parent?
If you have multiple prime parents for a child but there are certain messages that you only want one of the parents to receive, you are able to temporarily ‘opt out’ the parent who you do not want to receive the message.
This can be actioned via Dashboard > School Members > Search for child > Linked People > Highlight parent > Opt out
You can then send the message as normal, and the parent who is opted out will not receive the message.
Once you have sent the message, you can then opt the parent back in using the same instructions as above, to ensure they can receive future messages from you and access School Gateway again.
Can I schedule a message?
To schedule a message please go to:
- Click on Dashboard.
- Click on Messaging.
- Click on Compose a message.
- Select either Text or Email.
- Add the recipients and compose the message.
- Click on Send Later.
- Input the Date and Time required and click on Confirm.
To view Scheduled Messages (currently it is not possible to edit a Scheduled Message):
In the desktop version, the scheduled messages will always appear at the top, but the date range needs to cover the date it was created, instead of the day it’s scheduled to be sent.
Alternatively, in the web version, you have a separate scheduled folder which shows all scheduled messages and doesn’t require a date range to be entered.
Payments
Why can’t a Parent see a Payment Request?
There are several reasons why parents may not be able to view a payment request.
- The pupil may not be included in the request:
How to add a pupil to an existing payment request
- The request requires consent:
Parental Responsibility is needed for parents to be able to give consent, view online reporting information, see balances, and make bookings on School Gateway.
Parental Responsibility needs to be applied in SIMS (Section 5 of the pupil record) and then an import will need to be run in Schoolcomms for this to update.
To run an import in Schoolcomms you will need to be logged into the desktop version of Schoolcomms:
- Click on Management.
- Click on Import management.
- Click on Run import (you may have to input your SIMS credentials).
- The parents email needs re-enabling:
If a parent/Staff member is trying to make a payment on School Gateway but is receiving a ‘No valid email’ error and is unable to then make the payment, this error usually means the parents email needs re-enabling in linked people in Schoolcomms.
When an email needs re-enabling, it prevents a parent/staff member from making any payments. Here is the direct link to some useful information to assist you in checking and re-enabling your data issues: Re-enabling data issues.
How can I change a payment request once someone has paid?
If the area of the Payment Request you want to amend is greyed out, this means it cannot be changed so you will need to complete the following steps (you will be unable to edit a Payment type, Bank account, the amount on a fixed instalment):
- Go to payments.
- Select the relevant Payment Request.
- Click edit.
- Add the word old to the name of the Payment Request.
- Change the visible to date on the Payment Request to yesterday so this expires the current Payment Request.
- Click Save.
- Go to Expired and select the old payment request.
- Click Clone.
- Change the name of the payment request to remove Clone and old and the visible to date.
- Change the other details you want to amend.
- Click Save.
If you want all the payments made to be on the same payment request, you can record a manual adjustment under the Manual Transaction screen.
How do I add a pupil/staff member to a payment request?
How do I extend the visible to date on an expired payment request?
I have refunded a parent and they have not had the money, why?
When issuing a refund for an online transaction, it is important to action the refund via Online Transaction Refunds and not Manual Transactions.
If the refund was recorded in manual transactions for the parent to receive the refund, you would need to send them a cheque.
Alternatively, if the original payment was made with the last 180 days, you could reverse the refund in manual transactions and refund via Online Transaction Refunds.
Before reversing the payment, we would advise you check you have an available balance to refund.
To view the balances you have available to make refunds, please go to:
- Management Reports.
- Payments (4th from the bottom).
- Balances Available to Refund.
Please find instructions below to assist you in reversing a refund that has been applied as a Manual Transaction, enabling you to then apply the refund as an Online Transaction Refund:
- Go to Payments, Manual Transactions.
- Search and click on the pupil’s name.
- Select the request you had previously applied the manual refund, change the ‘no action’ to ‘manual Adjustment’.
- In the amount box, input the amount you had previously refunded; there is no need to add a plus sign.
- Add a comment explaining the adjustment.
- Select Apply actions to confirm and the transaction will be processed.
Here is the direct link to assist you with refunding the parent via Online Transaction Refunds:
Online Transaction Refunds.
What do we do if a parent wants to still pay by cash, but we want to go cashless as a school?
PayPoint allows you to be completely cashless by allowing those people who are unable to access a School Gateway account to pay in various stores across the UK: PayPoint Voucher.
How do I record a cash payment or Child Care vouchers in Schoolcomms?
Here is a link to assist you with recording a transaction in Manual Transactions: Manual Transactions.
When do Schoolcomms settle the money into our bank account?
We make a payment into your bank account fortnightly (or weekly if requested) on a Thursday once your bank account has been approved.
To check if your bank account is approved:
- Go to payments.
- Click Payment Settings.
- Under the relevant bank account, it will show enabled/disabled or awaiting approval – if your bank account is awaiting approval, click on to it and follow the prompt on the screen to submit your bank details to us.
Which report can I use to Reconcile our Settlements?
How can we check our Transaction Charges?
Which Payment Reports should I use?
Is a Bank Transfer payment a direct debit?
Clubs
How do I remove a session from a club?
How do I add a new pupil to the club?
How do I change a club booking choice?
How do I book a member onto a club session?
How do I remove a pupil from a club session?
Can a parent cancel a club booking?
Once the school has enabled the facility for parents to cancel their own Club session by ticking the option in the Clubs Settings, parents will be able to cancel a session up to the cut-off point set by the school in the Club.
Users will be able to cancel and make changes to their booking up until the booking cut off time. When a booking is cancelled, a credit will be applied to the balance to reverse the charge that was created when the booking was made. When a booking is changed, a credit will be applied to the balance to reverse the charge that was created when the booking was made and a new charge will be applied.
Please find a direct link below to assist you with your Club School Gateway settings:
School Gateway Settings
Please click here for a link to useful bitesize video to pass on to parents to assist them with cancelling/amending a club booking on School Gateway via the web/app.
Does recording an absence on the Club register refund the parent?
The register is for reporting purposes only; it will not affect the member’s balance. The member would need to be removed from the club session to credit their School Gateway account. To refund the parent back to their payment method, you would action the refund in Online Transaction Refunds.
Which Club report should I use?
How do I check a balance for a child in a club?
- The Club Balance report will display all the clubs and the balances for all club members. To access this, Click into Clubs > Club Reports > Club Balances. To view the transactions, click on the arrow the right of the amount to see the club transactions report for that club member.
- The Club Member Summary Report will display all the club members and the balances across all their clubs. To access this, click into Clubs > Club Member Summary Report. To view the bookings that have been made, click on the arrow to the left of the club member’s name.
Please note this report only reflects a child’s balance if they have a booking history against the club.
How do I manage people paying by Child Care Vouchers?
When creating a club, it is possible to accommodate parents who want to pay online via their School Gateway account, as well as those who want to pay using Childcare Vouchers.
To do this:
- Create your club as normal.
- Create a connecting active club payment request and only add the pupils whose parents wish to pay via their School Gateway account, i.e., using Bank Transfer or card payments.
- Create a connecting expired club payment request and only add the pupils whose parents wish to pay using childcare vouchers; the visible from, visible to, and due date must be in the past, i.e., yesterday’s date – this will not be visible via School Gateway but will allow you to process CCV payments via the manual transaction process.
- Once set up correctly, all parents whose children have been added to the active payment request will be able to book club sessions and will be asked to make payment. Parents whose children have been added to the expired payment request will be able to book club sessions and will not be asked to make payment.
Please note that club balances for childcare voucher payers will update in line with the voucher payments being applied via the manual transaction process.
How do I remove a pupil from an active club request who now wants to pay via Childcare vouchers?
Please find some useful information below to assist you with removing a pupil from a payment request that they have previously paid and who will now be paying by Childcare Voucher.
- Add the pupil to the existing expired Childcare Voucher Payer payment request.
You will then need to transfer the payment made on the active request over to the expired voucher request via manual transactions:
- Click on Manual Transactions on the left-hand side of the screen.
- Search for and select the school member.
- At the top of the screen, select the Payer name.
- Find the payment request you wish to process the manual transaction for.
- Select the manual transaction type, e.g. manual adjustment. In the amount column, type the amount as a minus amount. Enter a comment if you wish.
- Then go to the request you wish to transfer the amount to; select the action type ‘Manual adjustment’. In the amount column, enter the amount. Enter a comment if you wish.
- Click on Apply Actions in the top right-hand corner under the heading Transaction Controls.
- You will see a Manual Transaction Summary. N.B if you haven’t selected a payer you will see a warning message at this point.
- If a payer has been selected, there will be a tick box on the bottom left of this screen asking if you wish to send a transaction receipt to payer.
- If you are happy with this transaction, please click Confirm.
You will then see a message in a green box at the top of the screen confirming that the transaction has been processed successfully.
Once the payment has been transferred across to the Childcare Voucher Payer request, you will then be able to remove the pupil from the active request.
To do this, please go to:
- Click on the active payment request you want to remove the pupil from.
- Click on edit.
- Scroll down to the members and locate the pupil and click on the X next to the pupil’s name.
The parent will now be able to book the club sessions and will not be made to pay.
Why can a parent book and not pay for a club?
If the Club is set to Pay Later, the parent can book and pay later.
If you want the parent to pay at the time of booking, you will need to amend the club settings to Pay Now in club settings.
If the Club Member is not included in an active Payment Request linked to the Club, they will be able to make a booking and it will not ask for payment. Please check the following.
- Go to payments and select the relevant Club Payment Request.
- Click Edit.
- Check that the Payment Request Type is Clubs flexible and can be made more than once.
- Check that the payment request is linked to the Club.
- Check that Visible from and to dates are correct and current.
- Check that the Club Member is included in the Payment Request.
- Also ensure they have no data issues against their email address.
Why can a parent pay without booking a club?
If parents access the Payments area on School Gateway, they will be able to pay for a Club without making a booking. This means that if you have manually booked the parents in to the club, they can pay for it. Likewise, this facility allows parents to top-up their child’s club balance without necessarily making a booking.
We recommend you add a message into the Additional Information box of the Club Payment Request to make the parents aware that if they do not currently have a space booked, they need to book the club before making payment.
If the above is all correct, make sure the parents are not appearing in your Data Issues. If they are, please click here to resolve the data issue and re-enable the email address for the parent.
Why can’t a parent book a club?
- Please check that the pupil is in the Club: Add a pupil/staff member to a club.
- Parental Responsibility is needed for parents to be able to see balances and make bookings on School Gateway.
Parental Responsibility needs to be applied in SIMS (Section 5 of the pupil record) and then an import will need to be run in Schoolcomms for this to update.
- Make sure there are active sessions for the Club.
- Click into Club Settings and make sure Online bookings are enabled.
How can I Delete a club?
- When you are ready to permanently remove the club from School Gateway, go into Clubs and select the Club. Ensure that the club you want to Deactivate is displayed in the middle of the screen and select Deactivate from the right-hand side.
- Read the warning message to check that you are deactivating the correct club and click Yes if you are happy. This action cannot be undone.
- Once Deactivated, the Club will show in the Inactive club area on Schoolcomms and will also show in the Club reports.
Online Reporting
Can we display SIMS Timetables on School Gateway?
If you have our Online Reporting licence, you can display the next 10 school days SIMS timetable in School Gateway.
To do this log into the desktop version of Schoolcomms:
- Go to Online Reporting.
- Click to the tab for Timetable and click the box for the audience you want to see the timetable.
- Click Save.
Please remember you must run your import daily to ensure the timetable is up to date.
We are sharing Behaviours and Achievements, why can’t parents see them on School Gateway?
- Please check if the parents have Parental Responsibility in SIMS.
- Please check that your Schoolcomms import has been run successfully since any changes were made to SIMS.
Why can’t parents see a timetable?
- If the issue is only affecting one child, does the parent have Parental Responsibility in SIMS?
- Is the Timetable visibility checkbox ticked in OLR?
Is there a Data Issue for insufficient SIMS permissions for Timetables?
If so, the SIMS Permissions for the user running the import will need to be updated to include Third Party Reporter. Timetables will then be visible on School Gateway again after the next import.
Have the timetables been applied correctly in SIMS?
To check this, you can try to attach a child’s timetable via Timetables from SIMS when sending an email; from here, the timetable can be previewed without the message being sent to parents.
Behaviours and Achievements are ticked in Online Reporting, why can’t parents see them on School Gateway?
- If the issue is only affecting one child, does the parent have Parental Responsibility in SIMS?
- Has the import been run since the Behaviours/Achievements were entered in SIMS?
- Is there a Data Issue for insufficient SIMS permissions for Behaviours/Achievements?
If so, the SIMS Permissions for the user running the import will need to be updated to include Admissions Officer. - Is the behaviour/achievement type which has been entered in SIMS ticked in your Online Reporting settings?
Why can’t parents see medical conditions?
- Is the medical conditions visibility checkbox ticked in OLR?
- If there is a Data Issue for insufficient SIMS permissions for Medical conditions?
If so, the SIMS Permissions for the user running the import will need to be updated to include Admissions Officer. - Have the medical conditions been added correctly in SIMS?
Schoolcomms will only import from the Medical Conditions field in Section 7 of the child’s SIMS record.
Can we stop parents receiving Automatic Attendance messages?
Schoolcomms does not send automated absence messages to parents. The only messages received will be those manually sent by the school via Attendance Contact.
Parents will see any unexplained absences for AM/PM sessions in School Gateway (accompanied by an “X unexplained absences” note on the Attendance tab), but no message or notification is sent to them automatically.
Dinners
Parents are paying for dinners, but the balance is not updating.
The dinner payment request requires a specific payment type for the payments made to update the pupil’s balance.
To check this:
- Go to Payments and select the relevant Dinners Payment Request.
- Click Edit.
- Check the Payment Type and make sure the payment type prefix has the following:
- If you use Sims Dinner Money – Dinners:
- If you use a Cashless Retailer – Catering:
- If you use Schoolcomms Dinners – Schoolcomms Dinners:
If not, you will need to re-create your Payment Request with the correct type and manually transfer any payments across.
If the Payment Request is correct, and you use SIMS Dinner Money, ensure you have run an import (the SIMS user running this will need the Receipt Clerk permission group).
If you use a Cashless Retailer, we advise you to contact them to ensure they are successfully downloading payments from our system.
Schoolcomms Dinners
Can I create a special meal for one day?
Why when I apply my week to the calendar, does nothing appear under the days of the week?
When you create your meal item, you must click on the rotation box with two arrows ![]() next to the price and select the day/s of the week that the menu item applies to.
next to the price and select the day/s of the week that the menu item applies to.
To apply a rotation to an existing meal item:
- Go to the Dinner Plan.
- Click Manage Menu.
- Click the relevant week.
- Select the cog icon on the left-hand side next to the relevant item of food from the list.
- Click the Rotation box and select the day/days of the week required.
- Click the tick button and then click save.
How do I enter an opening balance for a Dinner Plan?
Once your Dinner Plan has been created, and before you make it visible to your parents, you may wish to record opening balances if you have already been taking money outside of Schoolcomms for your Dinners.
Please click here for full details. How do I check a child’s Dinner balance?
The Dinner Balance report will display all the Dinner balances for all members.
To access this:
- Click into Schoolcomms Dinners > Dinner Reports > Dinner Balances.
To view the transactions:
- Click on the arrow the right of the amount to see the club transactions report for that school member and adjust the date range as needed.
Within your Dinners system, you have a series of reports which will help you manage your Dinners and keep track of the balance. Click Here for the guide to assist you in accessing and using the reports.
How do I add new members to the Dinner Plan?
- Go to Schoolcomms Dinners.
- Select the required Dinner Plan.
- Click into Edit under Actions on the right-hand side of the screen.
- Scroll to the Plan member area and select the new member from the list on the left and add them to the list on the right and save.
- If you have a Payment Request attached to the Dinner Plan, click edit Payment Request, select the relevant Payment Request, scroll to the bottom of the screen, and add the new member here too and
Why can’t parents see the Dinners tab or balance on School Gateway?
- Parental Responsibility is needed for parents to be able to see balances and make bookings on School Gateway.
- Parental Responsibility needs to be applied (SIMS Section 5 of the pupil record, Arbor “Emergency contact” drop-down, or ScholarPack “Contact Order”) to the parent’s record in the MIS and then an import will need to be run in Schoolcomms for this to update.
- For SIMS schools to run an import in Schoolcomms, you will need to be logged in to the desktop version of Schoolcomms: Click on Management > Click on Import management > Click on Run import (you may have to input your SIMS credentials).
- For Arbor and ScholarPack schools to run the import in Schoolcomms, you will need to log in to the web version of Schoolcomms: Dashboard > Import Management > Click on Rub import.
Why can parents see the Dinner Plan on School Gateway but can’t make meal bookings?
- Once your Dinner Plan is set up, you can enable meal item visibility and online booking via School Gateway.
- Please click here for full details.
Meal Manager
How do I add a one-off meal e.g., Christmas lunch?
How do parents book meals on School Gateway?
Why are parents being charged for packed lunches?
- Log in to Cypad.
- Click on Cypad > Menus > Items.
- Select the Home packed Lunch item.
- Make sure the Subcategory is Home Packed Lunch.
- Remove the 0.00 from the amount box and save.
- Any packed lunches confirmed going forwards will not be charged. You will, however, need to submit a support request for any previous packed lunch charges to be removed.
How can I cancel/amend a meal that has been chosen?
- Before 12pm on the day – navigate to Cypad > Meals > Pre-orders, find the child, and click on the tickbox for the day. From here you can de-select or amend any choices and click Save
- After lunch service:
- If your school does not have a tablet: once your pre-orders have been automatically confirmed at 3pm, you are able to remove/amend the transaction. However, this can only be completed on the following day.
- Cypad > Meals > Transactions, find the child and click on the tick box for the day. From here you can de-select any choices and click Save.
- If your school has a tablet: you can amend/remove any meal choices on the tablet on the same day. Please ensure you then run a sync on the tablet to allow any changes to update in Cypad.
- Alternatively, you can make these amendments via Cypad > Meals > Transactions, find the child and click on the tick box for the day. From here you can de-select any choices and click Save.
- If your school does not have a tablet: once your pre-orders have been automatically confirmed at 3pm, you are able to remove/amend the transaction. However, this can only be completed on the following day.
Which are the best reports to use in Meal Manager?
Parents are making payments, but the child’s balance is not updating.
The Meal Manager payment request requires a specific payment type for the payments made to update the pupil’s balance.
To check this:
- Go to Payments and select the relevant Payment Request.
- Click Edit.
- Check the Payment Type is Catering flex can be paid more than once.
- The balances are updated every 20-30 mins.
- Check the student’s transaction history in Meal Manager > Transactions > Search the pupil > Click on their balance.
Parents are seeing a padlock icon when trying to book meals.
Parents will see a ‘padlock’ icon against certain dates in School Gateway, indicating they are unable to book meals for that day. This is determined by the lead days and cut-off time; if a parent is seeing this icon, it will likely mean they are past the cut-off time for that day:
You can check the cut-off times and lead days via Cypad > Settings > Site Info > Whiteboard – “Pre-order lead days” and “Parent pre-order cut-off time” settings.
Please find below some useful information on the different cut off times:
Parent pre-orders:
- Cut-off time is determined by the Parent pre-order cut off timein Cypad > Settings > Site Info > Whiteboard.
Whiteboard:
- Recording selections for current day – 12pm.
- You can still access the whiteboard after 12pm to record PM attendance (if enabled).
Pre-orders tab for current day (e.g., adding/removing pre-orders manually):
- Only available until 12pm (greyed out afterwards).
Transactions tab for current day (e.g., adding meals retrospectively that weren’t pre-ordered):
- If you have a tablet– only accessible the following day (so any meals for the current day that weren’t pre-ordered need to be added to the tablet and a sync run, otherwise they can only be added the following day).
- If you don’t have a tablet – accessible all day but you should still record any pre-orders via the Pre-orders tab to ensure your meal selection reports populate correctly.
When/how does the student/staff data update in Cypad?
Data syncs between Schoolcomms and Cypad:
- School members – 6am, 11am, 3pm, and 6pm each day.
- Payments/balances – every 30 minutes.
How do I configure allergies and diet types?
How do I view a child’s transaction history in Cypad?
- Cypad > Meals > Transactions, find child and click on balance.
- Any meals will be shown along with a running balance.
- Any payments made via School Gateway will show as ‘Schoolcomms Payment’ in this report.
Why can I still see my leavers in Cypad/Meal Manager?
Due to how your Cypad account is configured, your student/staff data is obtained directly from Schoolcomms. Although these students are showing as leavers in Schoolcomms (based on the leaving dates entered in SIMS), as they have not been deleted from Schoolcomms, they are still being passed to Cypad as ‘Open’ students.
In order for them to no longer be passed to Cypad (at which point they should change to ‘Closed’ on Cypad), you will need to follow the delete leavers process in Schoolcomms. There are some instructions below to assist you with this process.
Please click here to access some useful information to assist you in deleting your leavers.
Is it possible to record a meal for a visitor?
It is not currently possible for schools to manually add members into Cypad; the only way for meals to be recorded is for the school to add the member into SIMS as a staff member so that they are imported into Cypad.
Although you are able to add Visitors/staff members manually in Schoolcomms, this wouldn’t pull across to Cypad.
As a workaround, Cypad have suggested that you add various ‘generic’ visitor staff records in SIMS (e.g. ‘Visitor 1’, ‘Visitor 2’ etc.). These will then appear in Schoolcomms and Cypad and would allow you to record meals against them.
Pre-Admissions
Providing the pre-admissions are being imported into Schoolcomms (checkbox in Import Settings via Desktop > Management > Import Management > Edit Settings), then the pre-admission students will be made available for Cypad to pick up.
Data sync between Schoolcomms and Cypad
- School members (if you use the Schoolcomms API) – 6am, 11am, 3pm, and 6pm each day.
Please be aware that parents of pre-admission students are not able to see the Lunch Money tab in School Gateway, so they are unable to view the lunch balance or make any pre-orders, but they are still able to make payments.
Once the pre-admissions show in Cypad, you can manually add pre-orders when necessary and the balance will be visible once the pupil is on role.
School Gateway
Why can’t my parent create a School Gateway account?
How can I see who has signed up for School Gateway?
- Go to Dashboard.
- Click to Management Reports.
- Click on School Gateway.
- Click on School Gateway Status report to view who has signed up and who is using the App.
How can a parent see both of their children if they are at different schools? Or multiple children in the same school?
Can I unlock a parents School Gateway account?
If the parent has locked their account, you can unlock this by resetting the parent’s PIN number if they have an active School Gateway account. You will need access to the web version to do this:
- Click on Dashboard.
- Click on Linked People.
- Search and Select the Parent.
- If there is an Activation date under the School Gateway section at the bottom of the screen, click Reset Pin number from the right.
Can I reset a parent’s PIN?
You will need access to the web version to reset the PIN:
- Click on Dashboard.
- Click on Linked People.
- Search and Select the Parent.
- If there is an Activation date under the School Gateway section at the bottom of the screen, click Reset Pin number on the right.
What is a Bank transfer? Is a bank transfer a Direct Debit?
Parent/carer seeing old school on their School Gateway account
When a pupil moves schools to ensure that the parent/carer can see the new school on their School Gateway account:
- Ensure that the email address and mobile number combination held at your school matches the details held at the previous school – this would mean that both your school and the previous school would appear in the same School Gateway account. The previous school would then be removed when the school delete the child as a leaver from their Schoolcomms account.
or:
- If the parent has provided your school with a different email, the parent can register for a new School Gateway account using the new email address along with their mobile number, which would then only be linked to your school.
Can both parents have a School Gateway account?
It is possible for both parents to have a School Gateway account, providing they match your Import settings and have been imported into Schoolcomms with a valid email and mobile (they must have their own individual email address and mobile number).
You can check if the details have been imported by going to Dashboard > Linked People and search the parent.
Click here to access the support pages to assist you with checking your import setting:
To enable the parent/s to view balances, book clubs, give consent etc. the parent/s would need to have Parental Responsibility.
This is applied in SIMS section 5 of the pupils SIMS record.
When they log into School Gateway, they will see the child’s details, payment requests and balances etc. for the child.
They will not see each other’s details. If a payment request is set up as a Fixed amount only needs to be paid once (e.g., for a trip), both parents will see this, but once one parent has paid it, it will disappear from the other parent’s options to pay.
Parent cannot make a Payment
There are a few reasons that may stop a parent from being able to pay for a Payment Request within School Gateway. There are a few checks that can be done to resolve this problem:
- Within the Payments section of Schoolcomms, click on the required Payment request.
- Click edit.
- Scroll down to the Members section, displaying members to select on the left and selected members on the right. Does the student the parent is linked to appear in the right-hand column, Selected Members? If not, you will need to select the student from the left-hand menu and move them into the right-hand column. Please remember to save the changes
- Does the payment request require consent? This can be checked in section one of the open payment request. If the Require Consent box is ticked, then the parent must have Parental Responsibility ticked in SIMS to see this payment request on their School Gateway account.
- Is the parent showing in Data Issues as a blocked email address? If the parent appears on this list as either a Permanent Bounce or a SPAM report, their email address will need to be Re-enabled to be able to make a payment.
Why can a parent book and not pay for a club?
If the Club is set to Pay Later, the parent can book and pay later.
If the Club Member is not included in an active Payment Request linked to the Club, they will be able to make a booking and it will not ask for payment. Please check the following.
- Go to payments and select the relevant Club Payment Request.
- Click Edit.
- Check that the Payment Request Type is Clubs flexible and can be made more than once.
- Check that the payment request is linked to the Club.
- Check that Visible from and to dates are correct and current.
- Check that the Club Member is included in the Payment Request.
- Also ensure they have no data issues against their email address.
Why can a parent pay without booking a club?
If parents access the Payments area on School Gateway, they will be able to pay for a Club without making a booking, this means if you have manually booked the parents in to the club, they can pay for it. Likewise, this facility allows parents to top-up their child’s club balance without necessarily making a booking.
We recommend you add a message into the Additional Information box of the Club Payment Request to make the parents aware that if they do not currently have a space booked, they need to book the club before making payment.
If the above is all correct, make sure the parents are not appearing in your Data Issues. If they are, please click here to resolve the data issue and re-enable the email address for the parent.
Why can’t a parent book a club?
- Please check that the pupil is included in the Club: Add a pupil/staff member to a club.
- Parental Responsibility is needed for parents to be able to see balances and make bookings on School Gateway.
Parental Responsibility needs to be applied in SIMS (Section 5 of the pupil record) and then an import will need to be run in Schoolcomms for this to update.
- Make sure there are active sessions for the Club.
- Click into Club Settings and make sure Online bookings are enabled.
Can a parent cancel a club booking?
Once the school has enabled the facility for parents to cancel their own Club session by ticking the option in the Clubs Settings, parents will be able to cancel a session up to the cut-off point set by the school in the Club. Users will be able to cancel and make changes to their booking up until the booking cut off time. When a booking is cancelled, a credit will be applied to the balance to reverse the charge that was created when the booking was made. When a booking is changed, a credit will be applied to the balance to reverse the charge that was created when the booking was made, and a new charge will be applied.
Please find a direct link below to assist you with your Club School Gateway settings: School Gateway Settings.
Why can’t parents see a timetable?
- If the issue is only affecting one child, does the parent have Parental Responsibility in SIMS?
- Is the Timetable visibility checkbox ticked in OLR?
Is there a Data Issue for insufficient SIMS permissions for Timetables?
If so, the SIMS Permissions for the user running the import will need to be updated to include Third Party Reporter. Timetables will then be visible on School Gateway again after the next import.
Have the timetables been applied correctly in SIMS?
To check this, you can try to attach a child’s timetable via Timetables from SIMS when sending an email. From here, the timetable can be previewed without the message being sent to parents.
Behaviours and Achievements are ticked in Online Reporting, why can’t parents see them on School Gateway?
- If the issue is only affecting one child, does the parent have Parental Responsibility in SIMS?
- Has the import been run since the Behaviours/Achievements were entered in SIMS?
- Is there a Data Issue for insufficient SIMS permissions for Behaviours/Achievements?
If so the SIMS Permissions for the user running the import will need to be updated to include Admissions Officer. - Is the behaviour/achievement type which has been entered in SIMS ticked in your Online Reporting settings?
Why is a parent not receiving emails?
There may be a few simple reasons a parent does not get an email please can you check the following:
- Go to Dashboard.
- Click Linked People and search for the parent.
- Do they have an email address? If not, add this into section 5 of the pupils record in SIMS and run the import in Schoolcomms.
- If they have an email address, is it disabled? If so, this may be showing in your Data Issues as emails may have bounced or gone into Spam. You can re-enable the email address on the right-hand side, but only do this once you have confirmed the details with the parent and advised them to add your Schoolcomms email address to their address book, so it does not happen again.
If you sent the message to Prime Parents, make sure the parent is showing as a Prime Parent
To view the dispatch status for the message (if sent in the last month):
Why can’t parents see the Dinners tab or balance on School Gateway?
- Parental Responsibility is needed for parents to be able to see balances and make bookings on School Gateway.
- Parental Responsibility needs to be applied to the parents record in the MIS and then an import will need to be run in Schoolcomms for this to update.
- For SIMS: Section 5 of the pupil record.
- For Arbor: “Emergency contact” drop-down.
- For ScholarPack: “Contact Order”.
- For SIMS schools to run an import in Schoolcomms, you will need to be logged into the desktop version of Schoolcomms: Click on Management > Click on Import management > Click on Run import (you may have to input your SIMS credentials).
- For Arbor and ScholarPack schools to run the import in Schoolcomms, you will need to login to the web version of Schoolcomms: Dashboard > Import Management > Click on Run import. Wonde import data from Arbor and ScholarPack on an hourly basis so users will need to wait an hour before running an import to ensure the latest data is imported.
Why can parents see the Dinner Plan on School Gateway but can’t make meal bookings?
- Once your Dinner Plan is set up, you can enable meal item visibility and online booking via School Gateway.
- Please click here for full details.
Parent isn't receiving notifications
If a parent wishes to receive push notifications for their School Gateway APP, they must ensure that push notifications are manually turned on for this app within their phone settings.
Please find below details of how to enable push notifications for School Gateway:
Every device will have other settings that can affect push notifications e.g. Battery optimisation which prevents some devices from receiving Push Notifications when the battery is below a certain percentage.
Please can the parent also check that they are on the latest version of the School Gateway APP.
They can check this in the APP store or log out of the APP and uninstall and re-install the APP.
The parent would need to refer to the help guide for their specific device or contact their provider if they are still not receiving the notifications and have followed the guidance below.
For Apple devices:
- On your phone go to Settings
- In here scroll down to the “Notifications Centre”
- Select School Gateway
- In here ensure that under the heading “Notification Centre” it is switched on
- Close the screen; you will now receive notifications when new app messages come through
For Android devices:
- On your phone go to Settings > Applications Manager
- Scroll down your list of apps until you find School Gateway and select it
- In here there will be a tick box that says “Show notifications” ensure this is selected
- Close the screen; you will now receive notifications when new app messages come through
For Samsung devices:
- Tap the Apps icon on your home screen
- Tap Settings
- Tap Apps or App Manager
- Scroll down and tap School Gateway
- Tap Notifications
- Confirm Block all is toggled OFF (Samsung/other devices, Toggle Allow Notifications ON)
- Restart your device.
For Huawei devices:
- On your phone go to Settings > Notification and Status Bar > Notifications Centre
- Scroll down your list of apps until you find School Gateway and select it
- Activate ‘allow notifications’ and ‘priority display’
- Restart your device
- You will now receive notifications when new app messages come through
Data Management
What are Data issues and why do I need to deal with them?
Each time you run an import, Schoolcomms will run a check on your data and if there are any anomalies it will produce a report a task list/report of Data Issues which you are prompted to view and action. Any changes will need to be completed via your MIS and then the import re-run to remove the Data issue.
Click here to access the support pages to assist you with your Data Issues.
Why are old pupils/staff showing in Schoolcomms?
After a school member reaches their leaving date in SIMS and the import is run in Schoolcomms, they will be flagged in Schoolcomms as a Leaver.
Click here to access the support pages to assist you with deleting your leavers.
Why are there crosses on my Payment and Club reports?
It is a GDPR requirement to remove data that is no longer required. If you would like to increase the two-week window, please click here.
Can we schedule an import?
Can we change our import settings?
What SIMS Permissions are needed for a successful import?
How do you add additional users?
How do I reset my password/memorable data?
The Memorable Data and Password can be reset by the Schools Multi-user Administrator:
On the Desktop version of Schoolcomms:
- Go to Management.
- Click Manage Users.
- Select the username you wish to reset the details for and select reset Memorable Data or Password at the top of the screen.
On the web Version of Schoolcomms:
- Go to Dashboard.
- Click User Accounts.
- Select the username you wish to reset the details for and select reset Memorable Data or Password on the Right.
What is the difference between Prime Parent and Parental Responsibility?
- Prime Parent is a Schoolcomms term, referring to the child’s ‘main contact’. When you set your import settings, you will decide which Priority groups from SIMS you want to make your Prime Parents.
- Parental Responsibility is needed for parents to be able to give consent, view online reporting information, see balances, and make bookings on School Gateway. Parental Responsibility needs to be applied in SIMS (Section 5 of the pupil record) and then an import will need to be run in Schoolcomms for this to update.
Why are there non-prime parents in Schoolcomms when we only import Priority 1 parents?
It is possible to manually import individual contacts from SIMS/Arbor/ScholarPack that do not meet your normal import settings; these will come into Schoolcomms as non-prime Parents. Also, this contact may, at some point in the past, have met your import settings.
If you would like to remove them from your Schoolcomms account, you can submit this request by sending an email to support@schoolcomms.com.
If an individual contact’s priority has been changed to a Priority, you are no longer importing in SIMS, and you are able to delete them in Schoolcomms.
To delete the contact in Schoolcomms, please go to:
- Desktop version of Schoolcomms (you would access this via the desktop icon or via the focus menu in SIMS).
- Run an import.
- Click on ‘school members and groups’.
- Click on ‘Manage school Members’.
- Search the pupil’s name.
- Click on the ‘Linked People’ icon.
- Click on the contact you need to delete.
- Click ‘Delete’.
Once deleted, they will not be re-imported as they no longer have a Priority that you are importing.
Can I see a list of which parents we don’t hold either an email address or mobile for?
- Go to Dashboard.
- Click on Management Reports.
- Select the report: School Members and Their Linked People.
Where can I see in Schoolcomms if a parent has Parental Responsibility?
- Go to Dashboard.
- Click on Management Reports.
- Select the report Registered Users report.
FAQs for Schools using an MIS that isn’t SIMS
I am changing from SIMS to a new MIS. What happens?
When you change from SIMS to a different MIS, we need to create a new Schoolcomms account for you.
This means:
- You will have new log-in details for Schoolcomms.
- You will have a new inbound number which will need to be communicated to parents.
- You will need to recreate Payment Requests, Clubs, and Schoolcomms Dinners (depending on your licence) in the new Schoolcomms account and manually move any existing payments from the old account to the new one.
How do I import school members in to Schoolcomms?
All School Members (pupils and staff) will need to be entered into a CSV file and imported in to Schoolcomms.
Part 1:
Complete the following information on the spreadsheet we have sent you:
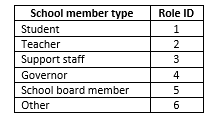
- The field types are as follows:

- The role types are as follows:
- Remove the column headers (the top line) from the spreadsheet:

- Save the Excel sheet with the following file type: ‘CSV (Comma delimited) (*.csv)’
Part 2:
- Log in to Schoolcomms and go to the Management tab.
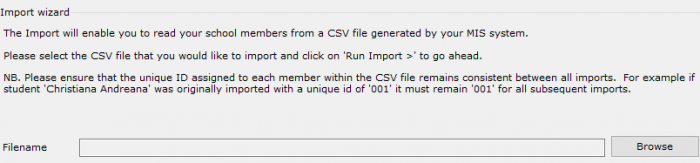
- Click on Browse and select the CSV file you saved earlier.
- When the file name is showing, click on Run Import to bring the data into Schoolcomms.

I need to change details for a school member or add/remove a school member?
If you need to make any changes to the details for a School Member (such as their registration group), or you need to add or remove a member, you will need to update your CSV file and re-import it in to Schoolcomms.
Once you have updated your spreadsheet re-import the new data.
If you have removed a member, you can now delete them from Schoolcomms.
How do I link the parents to a child in Schoolcomms and add their contact details?
You will need to individually add each parent along with their email address and mobile manually into Schoolcomms, following the steps below.
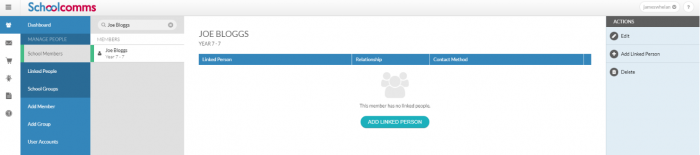
- Click on School Gateway from the bottom of the left-hand menu.
- Select the School Members Tab; you may need to press the 3 lines in the top left for this to appear.
- Select the child you want to add the contact for, click on Add Linked Person to add the contact details for the first parent.
- Complete the personal details for the parent.
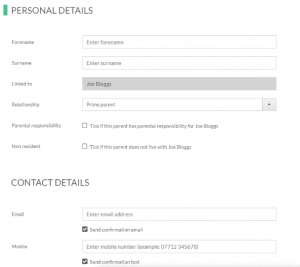
- Select the Relationship you want for the parent.
- Tick if the parent has Parental Responsibility.
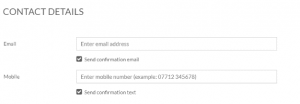
- Add the contact details and choose if you want to send a confirmation email or text to the parents. Click Save.
- If you want to add an additional contact, click Add Linked Person from the right-hand side menu and repeat steps 5-8 above.
- Any changes to these linked people will also need to be done here by clicking edit from the right-hand side menu.
How do I add the contact details for staff members?
You will need to individually add the email addresses and mobile numbers manually into Schoolcomms, following the steps below.
- Click on School Gateway from the left-hand menu.
- Select the Management Tab.
- Click on School members.
- Select the member of staff, click on Add Linked Person to add the contact details for this member.
- Add the email address and mobile number.
- Choose if you want to send a confirmation email or text.
- Click Save.
What do I need to do at the start of a new academic year?
At the end of the academic year/beginning of the new academic year, you will need to update and re-import your spreadsheet (CSV file). You will need to remove any leavers and add any new members. All the registration groups and year groups of existing school members will need to be updated to reflect the new academic year. Once the spreadsheet is updated, you will need to re-import this into Schoolcomms.
You can then delete any leavers when you no longer wish to have any further contact with them.
How do I delete my Leavers?
If you have removed a member from the re-imported CSV file, they will show in the task list area and you will see the following message.

Click on the Icon and select the members you want to remove by clicking on the name on the left. Click Add in the middle so the name appears in the right. Click OK at the bottom of the screen to permanently remove them from Schoolcomms.

FAQs for Schools using Arbor/ScholarPack
I am changing from SIMS to a new MIS. What happens?
When you change from SIMS to a different MIS, we need to create a new Schoolcomms account for you.
This means:
- You will have new log-in details for Schoolcomms.
- With the new account you only need to access via the web version of Schoolcomms: schoolcomms.com
The desktop version is no longer needed.
- You will have a new inbound number which will need to be communicated to parents.
- After the first import has successfully completed, the contacts with an existing School Gateway account will temporarily see the two accounts on School Gateway until the old account is disabled.
- Staff members are unable to see two schools on the same School Gateway account, so until the old account has been disabled, Staff members won’t see the new Schoolcomms account.
How do I import school members in to Schoolcomms?
Data requirements for ScholarPack
Wonde imports data from Arbor/ScholarPack on an hourly basis, so users will need to wait an hour after amending any details in Arbor before running an import to ensure the latest data is imported.
Will the Schoolcomms users transfer across to the new account?
Schoolcomms users will need to be re-created manually in the new Schoolcomms account.
Will I need to add the school bank accounts in the new account?
You will need to add any bank accounts into the new Schoolcomms account and follow the steps on screen for the bank account approval form.
Will Pre-admissions import across from Arbor/ScholarPack?
Pre-admissions will not be imported. The pupils will only import across to Schoolcomms on the date of admission.
Will the existing Payment Requests/Clubs/Club Bookings/Schoolcomms Dinners transfer to the new account?
- You will need to recreate Payment Requests, Clubs, and Schoolcomms Dinners (depending on your licence) in the new Schoolcomms account and manually move any existing payments/balances from the old account to the new one.
- Here is a link to assist you with recording a transaction in Manual Transactions: Manual Transactions.
- Recording/transferring an opening balance for Dinners or Clubs.
Once your Dinners/Clubs have been created, and before you make it visible to your parents, you may wish to record/transfer opening balances if you have already been taking money outside of Schoolcomms for your Dinners/Clubs or you are creating a new Dinner Plan or Club:
- Log into Schoolcomms and click on Dinners or Clubs.
- Once you are in Dinners/Clubs, click on Record Charges from the menu on the left-hand side of your screen.
- Select the Dinner plan/Club you want to record the charge for from the list on the left-hand side of the screen.
- Under the members name you wish to record an amount for, click in the No Action
- Select if you wish to record a credit (positive balance) or a charge (negative balance).
- Add the amount of the balance into the amount box.
(It is not necessary to apply + or – when applying a credit or a charge). - Repeat this process until you have added/amended all the balances you need to.
Once you are happy, click Apply Actions on the top right corner and this will save the changes and update the balances for Dinners/Clubs in Schoolcomms and in School Gateway.
Why can’t Staff members see the new account?
Staff members are unable to see two schools on the same School Gateway account, so until the old account has been disabled, Staff members won’t see the new Schoolcomms account.
Will we still have all the same groups?
- Along with the standard Year/Reg/House groups, Schoolcomms will import any custom MIS groups created in Arbor (via School > School Structure > Custom Groups), providing these contain active members.
- For ScholarPack schools, Schoolcomms only imports the standard Year/Reg/House groups – custom groups are not supported so these would need to be created manually in Schoolcomms (Create a group in Schoolcomms).
- MIS: Tier – All Tiers does not exist for Arbor/Scholarpack schools, as this is not provided to us by Arbor/ScholarPack/Wonde (unlike SIMS).
Will parents need to re-register for School Gateway?
If parents are using the same contact details in the new account and the old account, they will see the new account in School Gateway.