Hot Topics
Book a Q&A Support Session
We’re here to help.
To provide you with extra guidance, we’re offering free 1 on 1 Q&A sessions with our experienced support team:
- Get 1 on 1 support with one of our friendly team members.
- Have the opportunity to ask as many questions as you need answers for.
- Refresh your memory across Schoolcomms with interactive sessions utilising screen sharing.
- Be able to join us from anywhere, even if you’re working from home.
September Readiness Help Guides
Adding a One-off Meal Choice
School Gateway FAQ
*NEW* Full School Gateway Guide for Parents
To help parents make the most of School Gateway, you can now download this complete guide to the School Gateway App. It covers everything a parent needs including: account activation, PIN reset, setting up bank details, and guides on using every Schoolcomms module.
Accessing Schoolcomms From Home
There may be times where you need to access Schoolcomms outside of school, to send an emergency message or work from home. Below are a few common questions and answers so you can prepare for such occurrences.
Please remember that if there are any issues with your data or the data does not comply to SIMS data requirements your parents may not receive any communications.
Please see section below for help with managing data issues.
For help with SIMS data requirements please see here.
“Can I access Schoolcomms from home?”
You can access Schoolcomms from home by going to www.schoolcomms.com and clicking the login button and then school login. You will be prompted to enter your Schoolcomms username, memorable data and password.
From the Web messenger you can send an email/text, view the inbox, view sent items, access the payments area (if applicable) and view information regarding School Gateway. You will not be able to perform a Schoolcomms import and the data will be from when an import was last completed within the school.
Please note: if you are accessing Schoolcomms from home via smartphone you will only be able to send text messages. To send emails from home either use a tablet and go to the url app.schoolcomms.com or use a computer to access the login via the https://schoolcomms.com site.
“We are running low on text credits, how do I top them up?”
It is always a good idea to ensure that you have enough text credits on your account to send one message to every parent in an emergency. With the risk of snow closures over the winter months it would be sensible to check your current number of credits by going to Messaging | Send a text and clicking on the “Text credits” button.
Check these guides for assistance ordering text credits:
How to order text credits via Schoolcomms on the web
How to order text credits via Schoolcomms desktop
Remember, the cost of each text credit is lower when buying a bigger bundle, if you think you may be sending lots of messages regarding school opening times/snow closures during the winter then it might be worthwhile adding a larger bundle now.
If your school have purchased an unlimited text licence and you are being asked to top up it is because the order process is exactly the same we just will not charge you for these credits. When it asks for a purchase order number please enter the word “Unlimited” and this will prompt our accounts team not to charge you.
“What is the best practice when sending an emergency message?”
If you are sending an emergency/high priority message then it is advised to change the ‘Send by’ option to SMS only instead of using App or SMS. App messages are sent via the internet and so to receive the message the recipient needs to have an internet connection, it is more reliable to send messages that require an instant delivery by SMS to ensure that the recipient gets your message in good time.
Also a quick way to select all students in the school is to use the group MIS Tier – All Tiers, which will save you some time when sending out urgent messages to the whole school.
Create and Amend Schoolcomms User Accounts
https://schoolcomms.com/support/user-permissions/
Some licence types are able to have unlimited Schoolcomms logins, meaning each Schoolcomms user has their own profile to log in with. You can create and amend Schoolcomms users if your Schoolcomms permissions are set to Multi-User Administrator.
Your school multi-user administrators can create, UNLOCK, amend and delete staff Schoolcomms user accounts.
Creating Additional Users
On the left-hand side of the screen click Dashboard and then User Accounts.
To add a user select Add New User Account and then fill in the details.
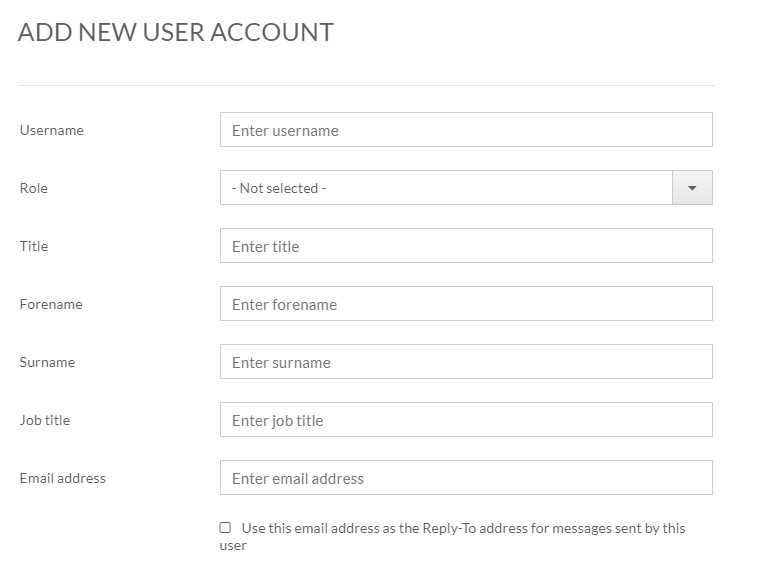
You will need to select a permission group, these groups decide what this user is able to see/do in Schoolcomms. To view the Schoolcomms User Permissions guide, please click here.
Hint: In this window there is a check box that reads “Use this email address as the reply to address sent from the compose email screen by this user”. If you tick this, then any replies to any email this user sends out in Schoolcomms will be delivered to their own email address provided on this screen.
Once you are happy with the details click Save on the top right-hand corner.
Memorable data will then appear for the user you have created, please write this down so you can pass this on to the user.
The users’ password will be emailed to them using the email address provided.
Amending Current Users
There may be occasions where you need to reset login credentials or disable/delete user accounts.
To reset the Memorable Data or Password for a user or to edit their details this would also be actioned through the Dashboard and User Accounts in the web version of Schoolcomms, by selecting the user and editing as required.
To disable a user, select the user and then click on disable user.
Ordering Text Credits
Schoolcomms Web Messaging
Within Schoolcomms click the Messaging icon on the left-hand side of the screen, then select Compose Message at the top of your screen.
Within the text messaging screen, you will see the Text credits button on the right-hand side of the screen. Click this.
You will be shown how many credits you have, click the Order A Text Credit Bundle drop down to view available bundles.
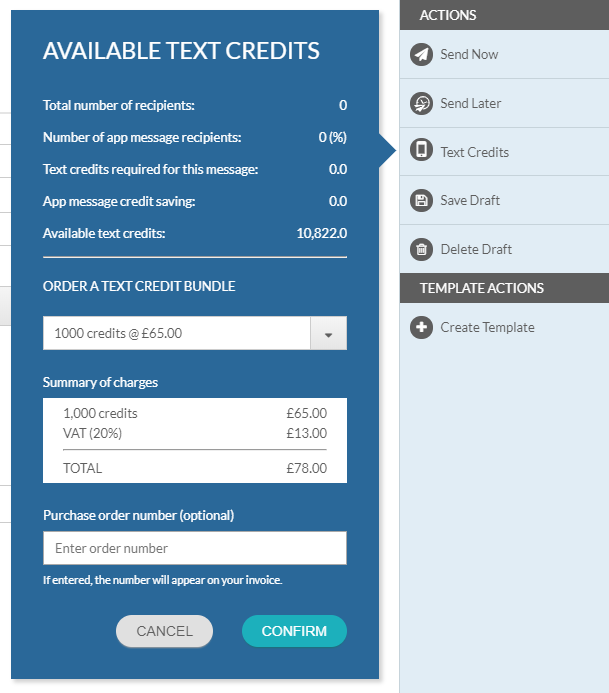
Select which bundle you wish to purchase and enter your Purchase order number. If you have an unlimited text licence then please enter ‘Unlimited’, you will not be charged. Click Confirm to finalise your order.
Your texts are available immediately and you will be invoiced for your chosen bundle.
Schoolcomms Desktop Messaging
Within Schoolcomms click the Messaging icon on the left-hand side of the screen, then select Send a Text on the left hand side.
Click the Text Credits icon at the top of the screen.
You will be shown how many credits you have, click Order credits to purchase more.
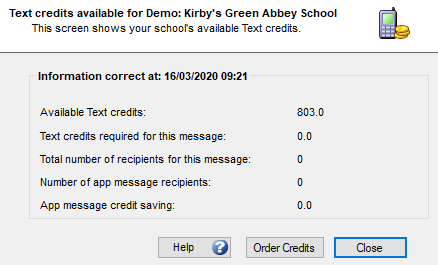
Select which bundle you wish to purchase and enter your Purchase order number and accept the license agreement. If you have an unlimited text license then please enter ‘Unlimited’, you will not be charged.
Your texts are available immediately and you will receive an invoice for your bundle in the post.
Storing Data in SIMS
To ensure all of your parental contact data is imported from SIMS it is important that address data is complete, up-to-date and stored in the correct area of SIMS.
To successfully import contact details, message contacts within Schoolcomms and for parents to access School Gateway, you will need the following data in SIMS:
For email addresses in SIMS please ensure that:
The email address is in Section 5 – Family and Home of the student’s record, in the correct parent’s record
The location of the address needs to be Home or Work
The parent needs to be Priority 1 for that student, or match your import strategy if you’ve changed who is imported
N.B. If you make any changes to contact or a student’s record in SIMS you will need to run the import in Schoolcomms to bring the changes across.
For mobile numbers in SIMS, please ensure that:
The mobile number is in Section 5 – Family and Home of the student’s record, in the correct parent’s record
The location of the mobile number is marked as Mobile
The parent needs to be Priority 1 for that student, or match your import strategy if you’ve changed who is imported
N.B. If you make any changes to a contact or student’s record in SIMS you will need to run the import in Schoolcomms to bring the changes across.
Parental Responsibility also needs to be applied in SIMS (Section 5 of the pupil record) for parents to be able to give consent, view online reporting information, see balances and make bookings on School Gateway. To review and identify any gaps in data currently imported into your Schoolcomms account, check your registered users with the Management Report.
Data Issues
Data issues are areas in your contact data that Schoolcomms has highlighted an issue with. Most commonly this is based around the contact details held in Schoolcomms but data issues also flag up any other errors the system may have found after an import.
When viewing your data issues the error column will give details of the data issue. This list can be both filtered and saved.
Data Issues include:
Permanent Bounce – At least three emails to this address have failed to be delivered. This could be because; the email is no longer active, or there is something stopping emails getting through on the contact’s side. Check with the contact that this email is still valid, if so you should ask the contact to add your Schoolcomms email address to their safe senders list on their email account. In order for them to receive emails again you will need to re-enable their contact details from the linked people screen.
SPAM – your contact has marked your email address as SPAM or junk, blocking the email address. Check with the contact that they want to receive your emails – if they do you need to re-enable their email address in the linked people screen. If this happens again, ask your contact to add your Schoolcomms email address to your safe senders list.
Text delivery failure – This means that the last three or more text messages you have sent to this contact failed to be delivered. Most commonly this is because the number is incorrect or invalid. Add the correct number in SIMS, run the Schoolcomms import and then re-enable the contacts mobile number from the linked people screen.
Invalid email/mobile – The email address or mobile number stored in SIMS is in the wrong format. Most commonly too many digits.
Permissions – If you see a message that says you don’t have the correct permissions in SIMS to run the Schoolcomms import. To resolve this issue you will need to get your SIMS system manager to correct these permissions.
Scheduled Imports
Summary
Audience – This guide is primarily for network managers or desktop support experts.
What is the Schoolcomms scheduled import? – The scheduled import enables schools to set up a scheduled task to run the Schoolcomms import automatically.
Can Schoolcomms be used whilst the scheduled task is running? – Yes, providing a different Schoolcomms user is being used to access Schoolcomms.
Prerequisites
To use these instructions, you’ll need to determine which computer will run the scheduled task. We recommend that you create the scheduled task on the school server to ensure optimal operation.
Schoolcomms user
Schoolcomms version 9.6D or newer must be installed on the computer (this can be verified on the login screen). If required, you can download the latest version of Schoolcomms here: schoolcomms.com/downloads
You will need to have access to a Schoolcomms user that has permissions to run the Schoolcomms import (either a school administrator or multi-user administrator)
If your school has a Schoolcomms Premium Messaging licence you can create a new user dedicated to the scheduled import. Find the User Management guide here.
If your school has a Schoolcomms Standard or Just Text Messaging licence, you cannot use Schoolcomms at the same time as the scheduled import is running. We would therefore recommend scheduling the import at times Schoolcomms would not normally be used by office staff.
SIMS user
You must use a SIMS user that can access all the areas that Schoolcomms reads from, and writes to, SIMS.
Windows user
You must run the scheduled task as a Windows user that has adequate permissions to run Schoolcomms and SIMS, and also a user that can be logged in with interactively to confirm if the import is completing successfully. The user must be able to access all the functionality and write to the Schoolcomms log file (stored in the AppData\Roaming\Username\Schoolcomms folder by default).
Access the full Scheduled Import Guide here
SIMS Permissions Needed for a Successful Import
Permissions needed for all Schoolcomms products
The permission groups required for a successful import of data for all Schoolcomms products are as follows:
• Admissions officer
• Attendance operator or Attendance manager
• Personnel officer
• Class teacher or Pastoral manager
• Third party reporter
Permissions needed for individual products
After running a Schoolcomms import, you may see a list of data issues relating to insufficient SIMS permissions as per the below examples:
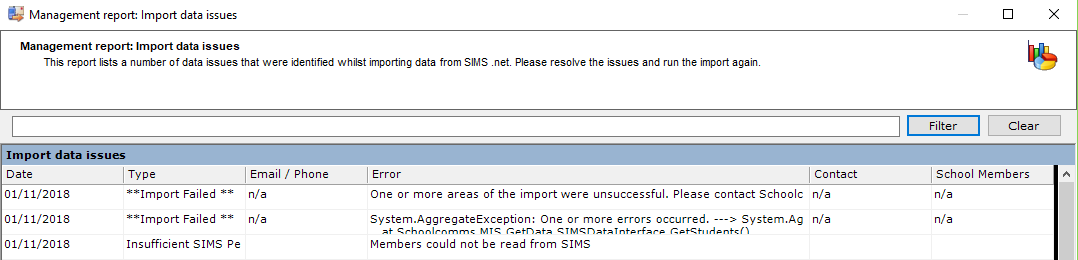

We strongly advise that any SIMS user running the import has all the above permission groups, however the below list identifies the specific groups required for any failed imports that may occur as a result of insufficient SIMS permissions:
General
| School members | Members could not be read from SIMS | Admissions officer |
| Member contacts | MemberContacts could not be read from SIMS | Admissions officer |
| Staff members | Members could not be read from SIMS | Personnel officer |
For class and teaching groups to be imported successfully, SIMS users also require the Pastoral manager or Class teacher permission groups.
Attendance
| Attendance summaries | AttendanceSummaries could not be read from SIMS
|
Class teacher or Attendance operator/manager |
| Unexplained absences | UnexplainedAbsences could not be read from SIMS | Attendance operator/manager |
Payments
| SIMS Dinner Money | This Dinner Money payment collected through Schoolcomms failed to be written to SIMS | Receipt clerk |
Online Reporting
| Timetables | Timetables could not be read from SIMS | Third party reporter |
| Student medical conditions | MedicalConditions could not be read from SIMS | Admissions officer |
| Staff medical conditions | MedicalConditions could not be read from SIMS | Personnel officer |
| Assessments | Assessments could not be read from SIMS | Admissions officer or Class teacher |
| Behaviours | BehaviourIncident could not be read from SIMS | Admissions officer |
| Achievements | Achievement could not be read from SIMS | Admissions officer |
Adding permissions groups to a SIMS user
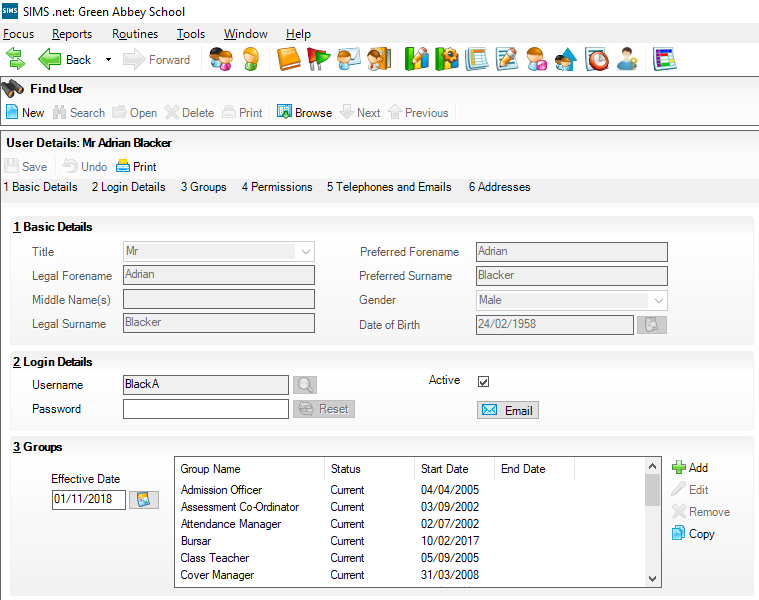
To add the above permission groups to a SIMS user, navigate to Focus > System Manager > Manage Users from within SIMS.
Search for the SIMS user and double-click on their name to open their record.
Section 3 shows the current permission groups allocated to the user; should any of the above permissions need applying, click on the Add button and select the relevant group(s) to add, then click on OK.
Save the SIMS user record to apply the changes.
Registered Users report
Did you know you can easily view the data last imported from your MIS by viewing the Registered Users report?
The report provides you with an overview for each contact being imported including email addresses and mobile numbers, you can also see if Parental Responsibility is ticked which is necessary for some School Gateway functionality, such as lunch money balances, club balances, providing consent, etc.
The report is accessible via the desktop and web version of Schoolcomms. To access the desktop version simply select Management | Management Reports double click on Registered Users. Type the forename or surname of the parent, staff or pupil in the white bar at the top of the screen and you will then be able to see the data you are currently importing from your MIS.
To access the report via the web, select Dashboard | Management Reports then click on Registered Users.