Messaging – Desktop
Logging in
You can access the Desktop version of Schoolcomms either via the Desktop Icon ![]() or if your SIMS is hosted, you would access Schoolcomms via the focus menus in SIMS.
or if your SIMS is hosted, you would access Schoolcomms via the focus menus in SIMS.
The multi-user at the school can reset a Schoolcomms user’s Memorable Data and Password, unlock a user, and edit the email connected to the account.
This would be actioned in Manage Users via the Web version.
Click on the user then click on edit and edit as required.
Full Messaging Training
Sending an Email
VIDEO: Sending an email
Creating an email
- To create an email message, click on Messaging in the left hand column > Send an email to access the main email screen.
- You can choose to edit an existing template for your email by clicking on Templates > Use Template or type your message straight into the text box.
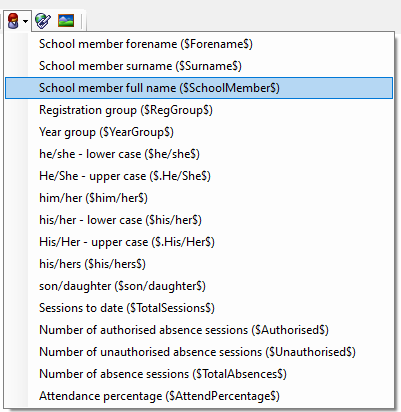
- You can change the appearance of your text by selecting the different options at the top of the text box area. To personalise the message, Mail Merge fields can be found under the Wildcard.
- In order to attach a document to your email click Attach.Note: Standard Messaging licence holders can attach files up to 3MB and Premium Messaging licence users up to 4MB.
Adding recipients
- To select recipients, select either the To Parents of or To School members
- Highlight the recipient(s) in the left hand box; select either To parents of arrow or to school member/Today’s teachers of/All teachers of to move over to right hand compose a message screen. Click OK to continue.
Creating a new email template
VIDEO: How to create message templates
- Select either Messaging > Send an email or Messaging > Send a text note: where you create the template will define its functionality. Eg. A template created under Send an email will only be available for use in an email message.
- Click Template > New
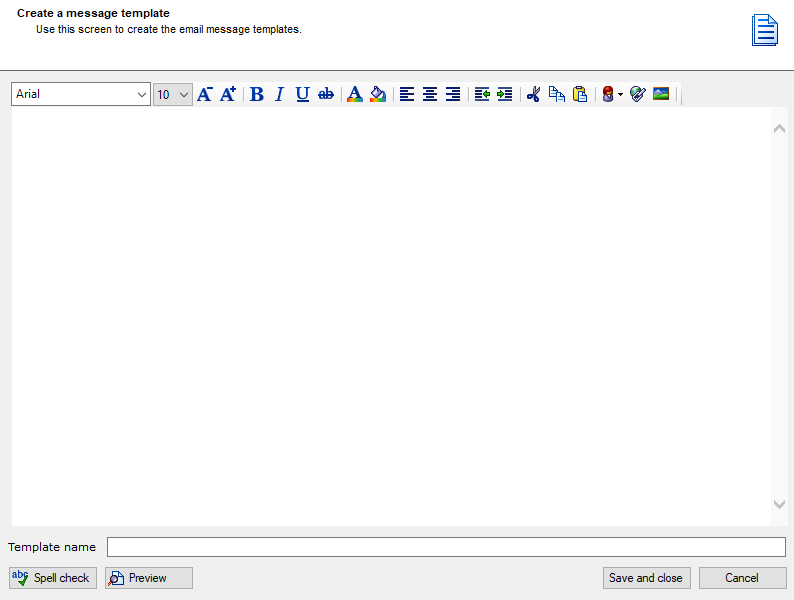
- Type out your template into the text box provided and name it. Click Save and close. Note: Any template can be made your default by selecting the template and then clicking Set as Default.
Sending an email
Before you send:
You can preview your email by selecting the preview button.
Spell check your text by pressing the spell check icon.
Send:
- To send your message immediately click, Send now (you will be prompted to enter a subject line if you haven’t already.)
- You can schedule your message up to two months in advance by selecting Send later. You can select the date and time you want to send your message by selecting from the calendar.
Note: these messages will appear in your sent messages and can be cancelled before their send time and date if required by clicking Cancel Scheduled. Only the user who created the message will be able to cancel it.
Premium Messaging users can choose to Send and log their message. Where they will be stored in the SIMS Communication Log. The send and log button cannot be used when scheduling a message to send later or if the message has SIMS documents attached. You can log the body of the message from the sent items screen.
Sending a Text Message
VIDEO: How to send a text
- To create a text and/or app message click on Messaging > Send a text.
- You can choose to insert a messaging template or compose your message by typing in the text box. Please note you only have 160 characters per message.
- This message can be personalized by adding Mail Merge fields by clicking on the Wildcard function in the toolbar.
- Adding recipients and sending your message follows the same process as sending an email message.
- If any recipients are using the School Gateway app, their message will automatically be delivered within the App.
Scheduled Messages
To schedule a message via the Desktop version of Schoolcomms, please go to:
- Click on Messaging.
- Select either Text or Email.
- Add the recipients and compose the message.
- Click on Send Later.
- Input the Date and Time required and click on Confirm.
To view Scheduled Messages (only the creator of the scheduled message can cancel the scheduled message):
In desktop, the date range in Sent Items needs to cover the date the message was created, rather than the date it is scheduled to be sent. Scheduled messages will always show at the top of the list, so even if you do have to extend the date range, you won’t need to scroll through the list of messages to find them.
Alternatively, Messaging on the Web has its own dedicated Scheduled folder and shows all scheduled messages regardless of date.
Via the Desktop:
- Click on Messaging.
- Click on Sent Items.
- Amend the date range to cover the date the message was created.
- Click on the message you would like to view.
When you have selected the message, the content will become visible in the main content field, and you will have the ability to cancel the message by clicking on the Cancel Scheduled icon.
Drafts
In Messaging:
- Click on required message type Text/Email.
- Click on Open Draft to view the drafts.
- Select a Draft to open or delete.
Ordering Text Credits
- Within the text messaging screen, you will see the Text credits button along the top toolbar. Click this.
- You will be shown how many credits you have, click Order credits to purchase more.
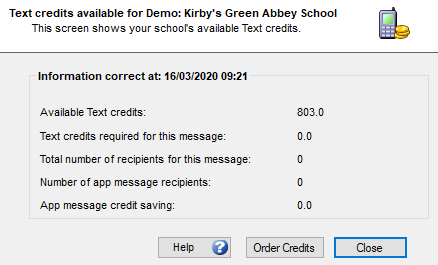
- Select which bundle you wish to purchase and enter your Purchase order number and accept the license agreement. If you have an unlimited text license then please enter ‘Unlimited’, you will not be charged.
- Your texts are available immediately and you will be invoiced for the chosen bundle.
Checking your Inbox
To view received messages click on Messaging > Inbox
Attendance messages must be processed in Attendance response and will appear both in the inbox and the Attendance response Click Attendance/Not attendance to change the status of the message.
Premium licence holders can choose to log a reply back to SIMS by clicking Log to SIMS in the top toolbar. If the sender is linked to more than one student, you will be prompted to select which student this message relates to.
Reply to a message by clicking Reply in the top toolbar and compose your message as normal.
Messages can be deleted by highlighting the message and clicking Delete.
Note: Messages can be deleted in bulk by holding down the Ctrl key on your keyboard to select multiple messages. Please be aware this will permanently delete the message.
Creating a paper list
If there are any recipients on your message that do not have the relevant contact details, a paper list will be generated.
Within Messaging > Sent items, select the message you wish to create a paper list for. Note: a paper list can only be created for messages sent within the last month.
Click Paper list in the top menu bar.
To obtain a list of contact details for the students who require a paper copy, select Click to view or save a CSV address and phone list of those people needing a printed copy.
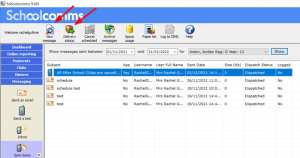
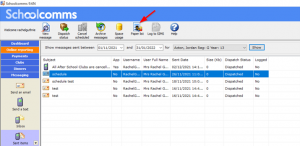
Sent items and delivery status
- You can check the delivery status of your messages from the sent items screen.
- These messages can be filtered by inputting the required date range and selecting the recipient using the drop-down menu and selecting Show.
- By highlighting a message, you can view the recipient list by clicking View Message > Click here to show recipient list.
- To check the delivery status of this message, select the message and then click Delivery status for a text message or Dispatch status for an email.
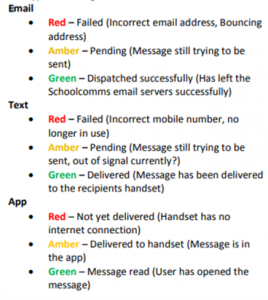
Please find below further information on the Delivery Status:
5. To retrieve a paper list for any sent messages, simply highlight the message and then select Paper list.
View Space Usage and Archive Messages
If you are unable to send a message, or you see a message regarding the remaining storage space available within your Schoolcomms account, you may need to archive or delete some of your Sent Items.
To view your space usage allowance click into the Sent items and select the Space Usage icon.
To archive messages, select the messages you wish to archive from the Sent Items screen and click the Archive Messages icon at the top of the screen. The facility to delete sent messages is only currently available via the web version of Schoolcomms.
Please remember to change the date range when archiving via the desktop, to ensure that historic messages are also reviewed; enabling you to completely free up your storage space.
The messages will be saved to a location of your choosing on your computer, and removed from Schoolcomms.
Sending a Message Directly from SIMS
- When viewing student detail within SIMS you can click the Send Message button.
- Select from the drop down menu, Send Email or Send Text. You may be prompted to enter your Schoolcomms login details
- Tick the Prime parent or All parents box and/or the student themselves and confirm by clicking
- You will then be taken to Schoolcomms where you can compose and send your message as normal.
Sending Dinner Money Balances
- Within the messaging menu on the left hand side, choose whether you want to send your message via email or text
- Select the recipients to add to your message
- Compose your message. Where you want the dinner money balance to show, insert the Lunch Money Mail Merge option from the wildcard list by selecting on the red-headed person icon
- Send the message when you are ready
Note: The dinner money balance shown will be accurate as of the time of your last Schoolcomms import
Send Management reports, curriculum & exam timetables
VIDEO: How to send management reports, curriculum and exam timetables from SIMS
Sending Timetables or Reports via Email
Sending SIMS Reports via Email
(The facility to email SIMS reports is only available via the desktop version of Schoolcomms)
There are two types of SIMS reports: Assessment Manager Individual Reports and Profiles reports.
- Assessment Manager – Individual reports are created in SIMS Assessment Manager; it is important to realise that this type of report is not automatically uploaded to the SIMS document management server (DMS) and only reports that have been uploaded will be accessible by Schoolcomms. Often this type of report consists of at least one table displaying a grid of results/marks/targets.
- Profiles Report – this enables the use of comment banks to produce more verbose reports which can include Assessment Manager results; comments can be automatically selected based on students’ grades for a particular aspect. Profiles reports are automatically uploaded to the SIMS document manager after generation.
Successful report attachments require:
- A recipient list containing students where at least one of the first 8 students have a report linked to them (Schoolcomms uses the first 8 students in the recipient list as a basis for populating the Report session drop down for the selected report type).
- If Assessment Manager Individual Reports has been selected, then the report must have been uploaded to the DMS.
If you are sending your reports in bulk via Schoolcomms using the ‘reports from SIMS’ attachment option, Schoolcomms will only send the relevant report to the appropriate child. If a child does not have a report uploaded in SIMS, the parent will not receive an email at all.
To send a SIMS Report:
- After composing your message and selecting your recipients, click Attach and select Reports from SIMS.
- In the drop-down list you can select the Report type you would like.
- Select Preview to view the report.
- If you have our Online Reporting Licence, you have the option to tick if you would like to Publish the reports to School Gateway (you are able to Publish and Unpublish retrospectively for more information, click here).
- To print from this screen, click Print.
- To confirm the selection, select OK to attach to your message.
Sending Timetables via email:
Premium license holders can email a student’s SIMS Profile or Assessment Manager reports via email.
- After composing your message and selecting your recipients, click Attach and select Timetables from SIMS.
- In the drop-down list, you can select the Timetable you would like.
- Select Preview to view the timetable. To print from this screen, click
- To confirm the selection, select OK to attach to your message.
Common issues:
If you experience any error messages when trying to attach the Timetables, please ensure that the Timetable has been applied in SIMS.
Incorrect week order when sending/previewing timetables:
- Are the weeks in the correct order when exporting the timetable in SIMS?
- If the incorrect order is only occurring in Schoolcomms, the school need to ensure the 1st day of the timetable cycle chosen before falls on the Monday of Week 1 (for example, if the selected date is Monday 13th September 2021, this is likely to be Week 2 on the school’s timetable cycle and hence Week 2 will be displayed first).
Why can’t parents see a timetable (Online Reporting Licence only)?
- Please check you have ticked Timetable visibility in Online Reporting.
- Please check if the parents have Parental Responsibility in SIMS.
- Please check that your Schoolcomms import has been run successfully since any changes were made to SIMS. If the SIMS import is failing in Insufficient SIMS Permission, make sure the user running the import has Third Party Reporter Checked.
- In SIMS, make sure the timetable has been applied correctly.
- If the academic year selected for the new timetable in SIMS is the next academic year, then the timetable won’t be visible in School Gateway until the new academic year is reached.
Attendance and absences
Process Attendance response
VIDEO: How to send an attendance message and process the response in SIMS
- To view and process Attendance responses from parents go to the left hand menu and click Attendance Response > Process attendance response
- Messages that have not been processed in the last week are displayed, you can filter these by selecting the dates you want in the date range. You can also filter by registration or year group by selecting a value in the drop down menu and clicking Show
- Once you have found the response you are looking for select it and then click Process response in the top toolbar. To work through a list of responses choose Select all and then Process responses
- The message from the parent is displayed on screen. Select the appropriate student from the drop down list and the appropriate date range for the response. Click Show tracked absences
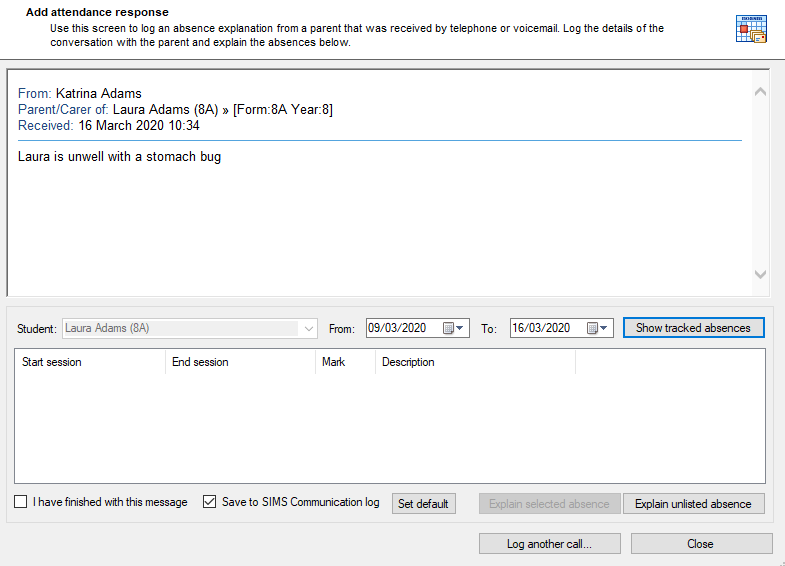
- Select the absence you wish to explain and click Explain selected absence
- Use the Date lists and AM/PM buttons to select the start and end sessions that are to be explained
- Choose the reason for absence from the drop down list. The first 250 characters of the message will be displayed in the SIMS register. The comment will not be shown if you untick the Write absence comment to SIMS tick box
- Only an N or – can be overwritten by Schoolcomms, any other marks must be changed within SIMS. The absence session is now shown as explained
- Select Write Mark or to cancel, click Cancel
- When you have finished with the message tick the I have finished with this message box and close
Log an Attendance call
VIDEO: How to log an attendance call
- To record an attendance related call in Schoolcomms select Attendance response in the left hand menu > Process attendance response > Log call.
- Type the student name or select it from the list then select the contact that has called from the list shown and select the date of the call by clicking on the calendar icon to expand the date range.
- Type a description of the message into the text box.
- Click on Show tracked absences, or Explain future absences.
- Change the date range for tracked absences if necessary.
- Confirm you wish to save your message, or go back and amend it.
- Select the absence period and click Explain selected absence or Explain unlisted absence.
- Select the start and end session and choose the relevant mark to write to SIMS and select Write Mark.
- To show the message in SIMS tick the Write absence comment to SIMS box, if you do not do this the message will not be displayed in SIMS.
- Remove the message from the Attendance response screen by ticking I have finished with this message.
Follow up past unexplained absences
- To follow up on past unexplained absences go to Attendance Contact > Follow up contact.
- Filter by year group by selecting/deselecting the relevant tick boxes and select the range to which you wish to follow up unexplained absences.
- Click Show when you are happy with your choices.
- Note: You may be asked to login to SIMS and you must have the relevant SIMS permissions.
- To show details of the absences select the school member and click Show detail. To contact the parents of each school members, tick the boxes to determine which method of contact will be used.
- Customize your message by selecting Message templates.
- When you have selected all your messages click Send now/Send and log.